How To Create Image And File Upload In PHP With JQuery AJAX
In this article, I will show you how you can upload file or image in PHP using jQuery, AJAX and MySQL.

Uploading files from clients to servers is one of the important features of any PHP application. However, implementation of feature with proper security and hassle-free configuration could be tricky. Developers could use several PHP file upload scripts to ensure that the application offers this feature seamlessly. I will discuss a popular strategy that developers could integrate within their projects.
Prerequisites
For the purpose of this tutorial, I assume that you have a PHP application installed on a web server. My setup is:
- PHP 7.1
- MySQL
- JQuery/Ajax file
To make sure that that I don’t get distracted by server level issues, I decided to host my PHP application on Cloudways managed servers because it takes care of server level issues and has a great devstack right out of the box. You can try out Cloudways for free by signing for an account and then following this simple GIF for setting up the server and the PHP application.
Now, that the configurations are ready, I will next work on the File Uploading Script.
The Process of File Uploading in PHP
The process of a complete PHP file uploading script is as follows:
- Create a Bootstrap powered HTML Upload form as the “frontend” of the script
- Ajax scripts for file upload
- Apply security checks
- Create PHP scripts to handle/process data
Create the HTML Form
The HTML form is the interface through which user interacts and submits the data. But to make form work with the file, it is important that <form> element must have its method set to POST because files can not be send to servers using the GET method. Another important attribute is enctype which should be set to multipart/form-data. Last but not least, the file <input> type attribute should be set to file.
Create a file index.php in your PHP project and type in the following code.
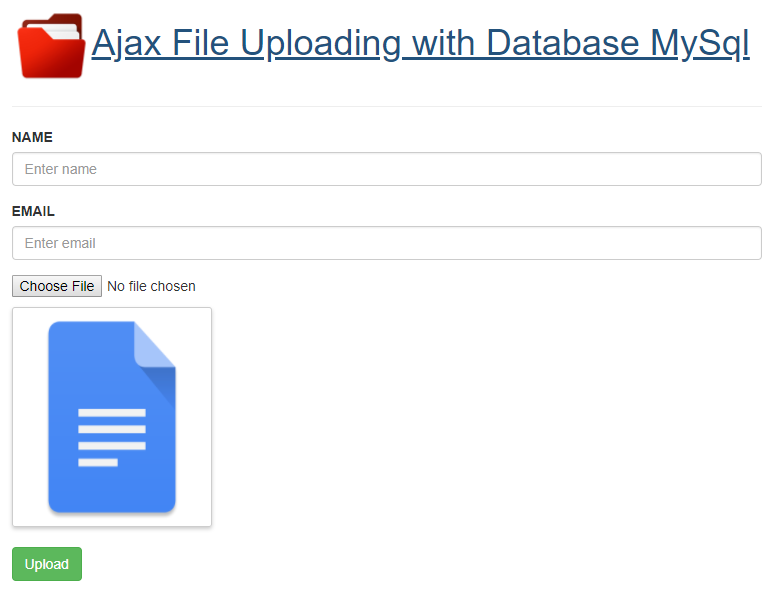
In this form, I have used Bootstrap Classes to apply a little bit of styling on the form. In this form, I have mentioned ajaxupload.php in the action attribute of the form.
Using jQuery & AJAX for File Upload
Since I will use jQuery & AJAX for submitting data and uploading the files, I will start by including the jQuery library first.
In above code using $ajax() method for send data to php also check the success data or errorin data sending.
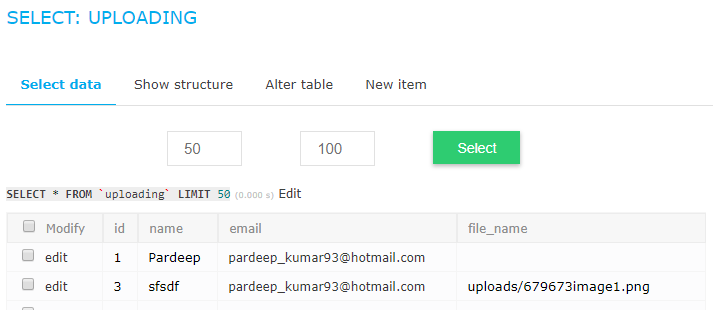
Configure MySQL Database
The next step is setting up and configuring the MySQL database. Go to the Cloudways Database Manager and create a table named ‘uploading’. The fields of this table are name , email , file_name. Alternatively, you could use the following SQL query:
Next, create db.php to connect the database with the PHP application. Paste the following code snippet in the file:
Create PHP Script for File Uploading
When the user interacts with this form, the file is uploaded to the temporary folder and all the information about the file is stored in the multidimensional array known as $_FILES.The Key Index of this array is the name attribute on this <input type=’’file’ name=”image” > field.
In this case, $_FILES[“image”] is the index name.more information about the file is stored in the following indexes.
Once the file has been uploaded to the temporary folder and all its information saved in the array, move_uploaded_file() function is used to move the file from its present temporary location to a permanent location. The process of uploading the file is as follows:
- Check if there are any errors in the upload.
- Check if the file type is allowed
- Check that the file is under the set file size limit
- Check if the filename is valid (if filename has a /, it will effect the destination path) .
- Check that the file doesn’t already exist at the target location (based on the name).
- Finally, upload the file.
Let’s create the PHP script to deal with the functionality of file uploading. Create ajaxupload.php and type the following code in it.
Now that all the checks have been coded in, I will move the uploaded file from the tmp folder to the upload folder. For this, first create a upload folder in the project directory. This is where the uploaded pictures will be saved.Where pathinfo() is the built–in function which will return the filename and extension in separate indexes.
Check if there are any errors in the upload
To check the error in the uploaded file, type in the following code, If the error is greater than zero then there must be an error in the process.
Check that the file is under the set file size limit
File size is measured in bytes. So, if the file size is set at 500kb, then the file size should be less than 500000.
Where move_uploaded_file is the function which will move the file from $myFile[“tmp_name”] (temporary location) to “upload/” . $name (permanent location) also check the database table record will be inserted.
Wrapping Up
In this tutorial, I demonstrated image and file upload in PHP using AJAX and jQuery. Here is a functional demo of the application where you could see the app in action. In my next tutorial, I will demonstrate how you could upload and store a file into the database using PDO.
Comments
Post a Comment