How to Integrate Facebook with WooCommerce

Are you a business owner with an online ecommerce store based on WooCommerce? Do you know that you can boost your online sales by integrating your WooCommerce store with Facebook? Facebook has gradually evolved its business-friendly features, such as dedicated brand pages, to help digital stores promote their products and highlight their brands.
In this tutorial article, I’ll show you how you can take your WooCommerce store to the next level with Facebook for WooCommerce.
Why Use Facebook for WooCommerce?
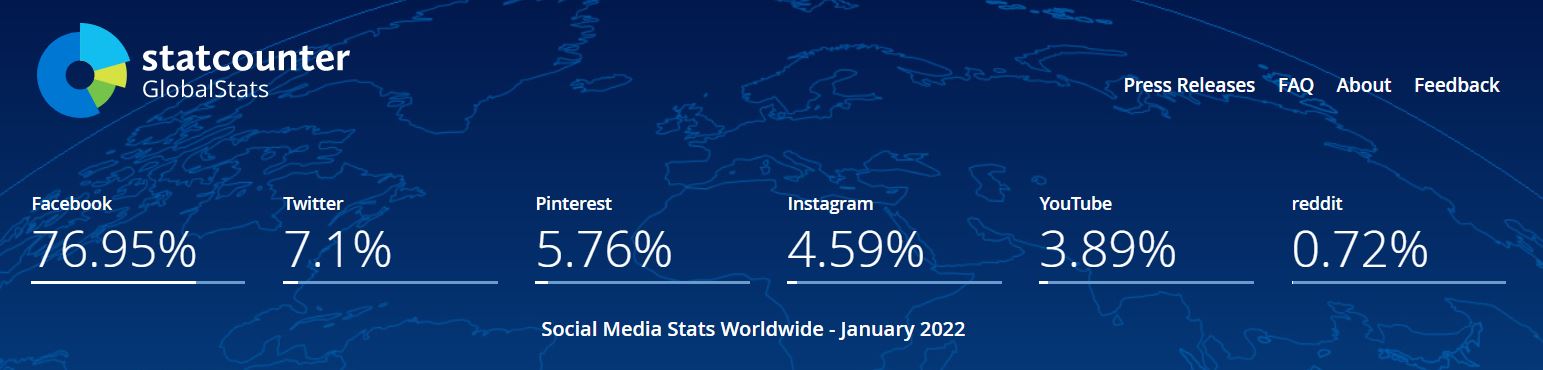
According to the statcounter, Facebook is the most dominant social media platform, with a 76.95% market share as of January 2022. That alone makes it an incredibly viable option to promote your WooCommerce store.
More specifically, you can also benefit from Facebook’s WooCommerce-friendly functionality. After connecting your WooCommerce store with Facebook, you can run an advertisement campaign, find new customers, set up an online shop to sell products, and measure results by analyzing customer actions on your website.
What’s more, by integrating Facebook with WooCommrce, you can:
- Get access to the greater potential audience out of approximately 2.91 billion users worldwide.
- Track conversions by using Facebook Pixel and analyze advertisement campaign results.
- Build better customer relationships.
- Quickly start selling products through Facebook pages.
- Transfer all store products and categories automatically.
Here’s how you can integrate Facebook with WooCommerce and reap all those benefits.
How to Integrate Facebook with WooCommerce
Integrating a WooCommerce store with Facebook is a simple matter, especially when facilitated by plugins that automate most of the process. Your choice of plugin will greatly impact the success of the process and subsequent operations of the Facebook page.
Some high-functioning plugins in this regard include:
- Social Shop for WooCommerce – By StoreYa
- Facebook for WooCommerce – By Facebook
- Facebook for WooCommerce – By WooCommerce
Note: Always select an updated plugin with plenty of active installations and good reviews, and which is compatible with the latest WordPress version.
In this article, I’ll take you through the integration process using Facebook for WooCommerce (By Facebook). I’ll also show you how you can integrate the two using the Facebook Business Account.
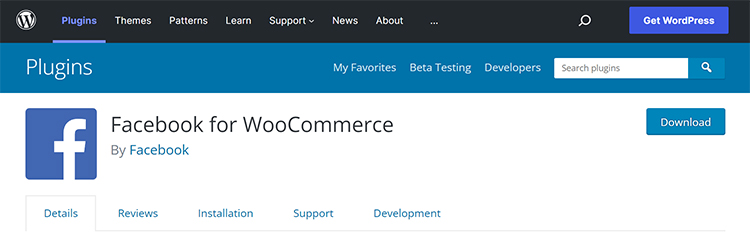
Facebook for WooCommerce – By Facebook Plugin
- First, you need to install and activate the plugin.
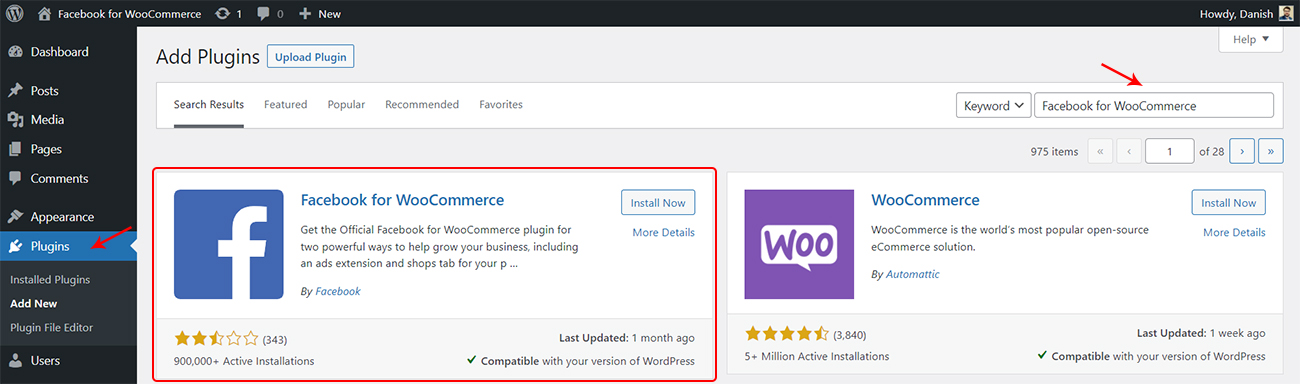
- Go to WordPress Dashboard → Plugin → Add new. Search Facebook for WooCommerce on the top-right search bar.
- Click on the Install button and then activate it after installation.
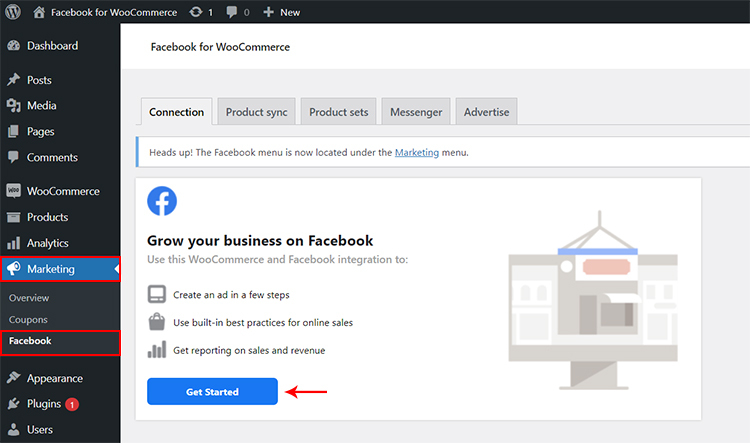
- After activation, a new menu item labeled Marketing appears at your WordPress admin panel.
- Go to Marketing → Facebook, and click on the Get Started button.
- You’ll be redirected to a screen to connect your WooCommerce store with a Facebook account.
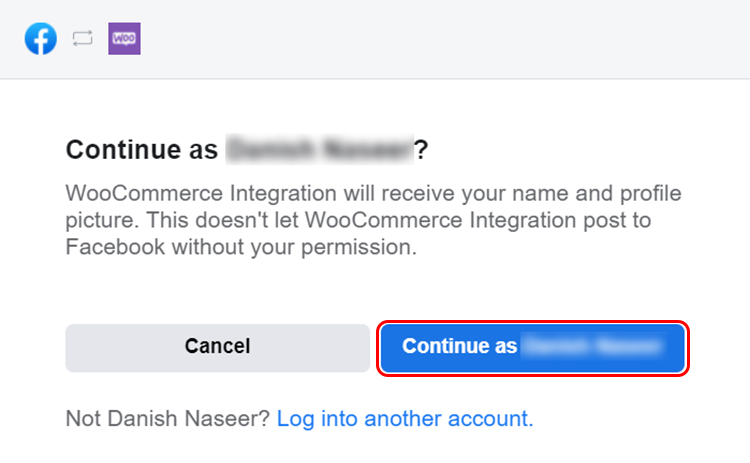
- Select the Facebook account you are already logged in to and click ‘Continue as…’.
- Another option is to log into another Facebook account.
- You’ll be asked three options on the next screen, i.e., Facebook Shop, Facebook Ads, and Instagram Shopping.
- For this tutorial, I recommend checking the Facebook Shop option only. If you want to add Facebook Ads and Instagram Shopping features, you can do it later directly from your Facebook business account.
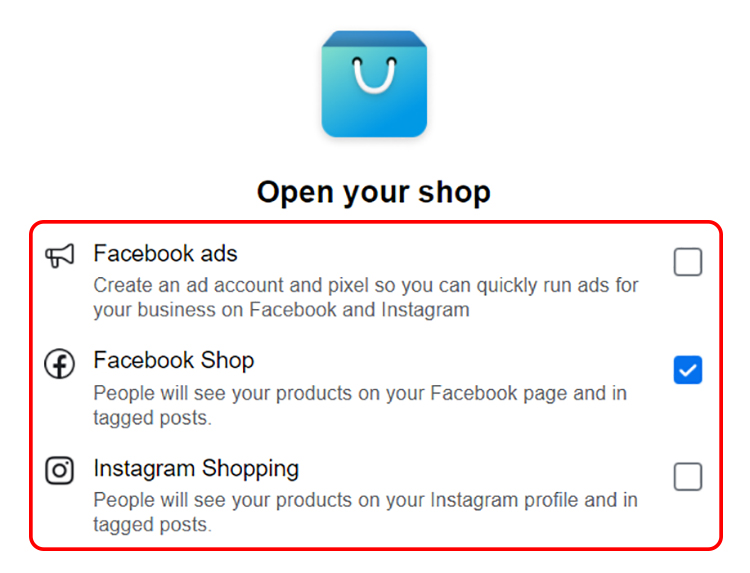
- Click on the Get Started button.
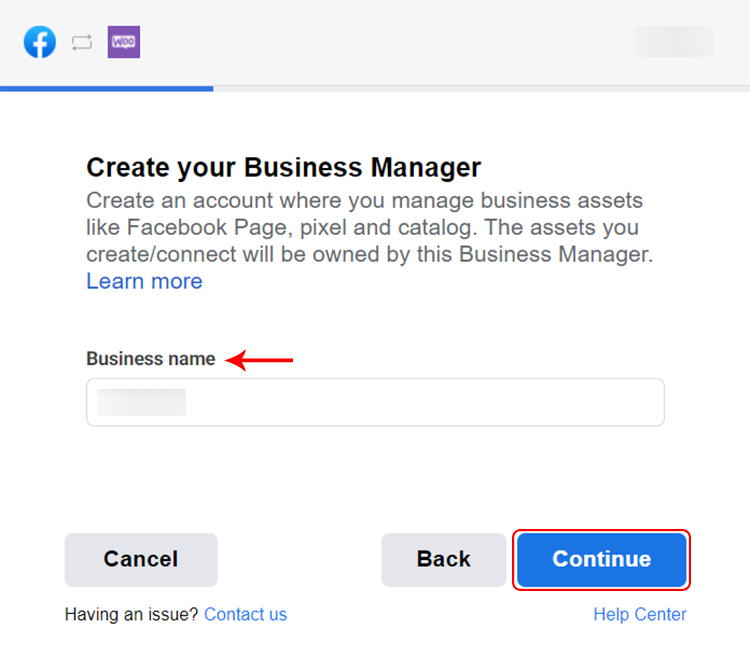
- After that, you’ll be redirected to the business account creation or selection window.
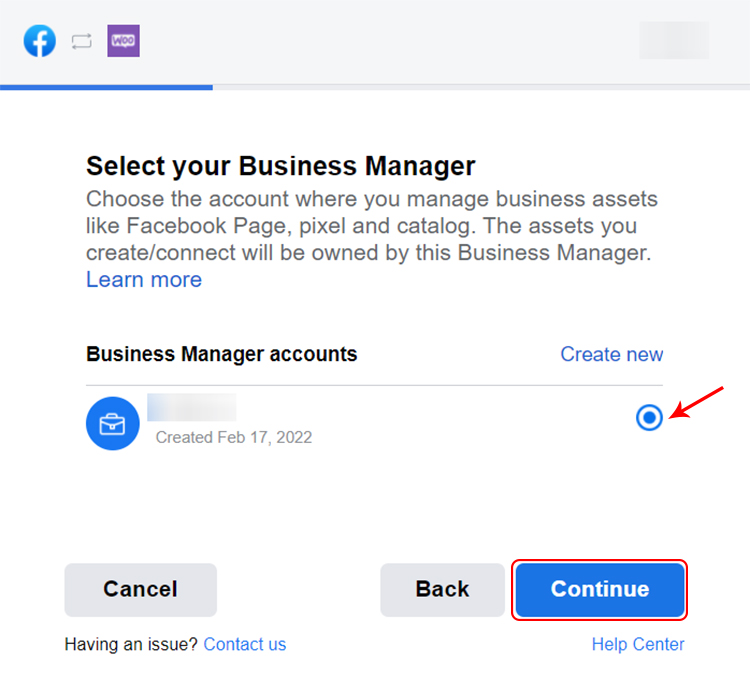
- Create your business manager account by putting the Business name and clicking on the Continue button.
- The name should be concise and valid.
- Once you’ve done that, In the next screen, your newly created business manager account will be selected already. Click on the Continue button
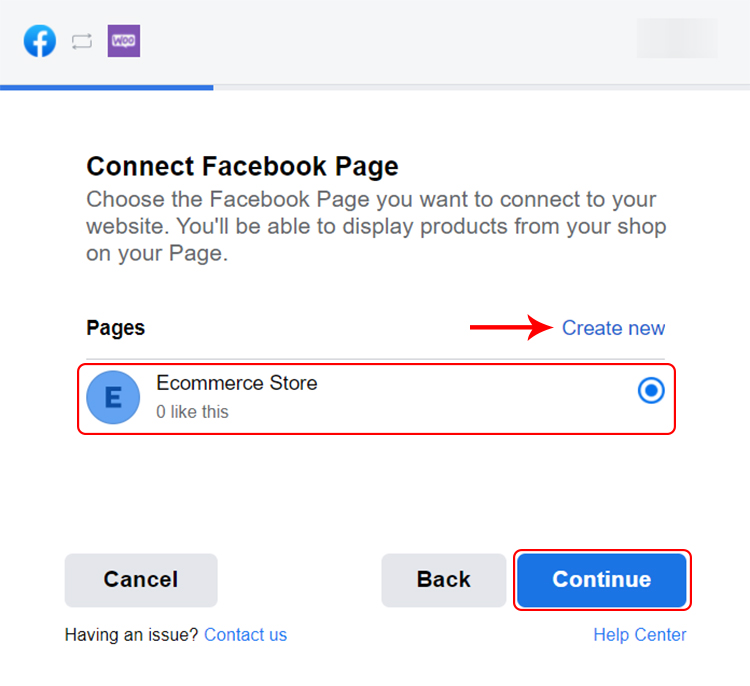
- Next, you need to connect to a Facebook page. If you don’t have it, you can create it by simply clicking on the Create new.
- Select the Facebook page where you want to display your WooCommerce products, and click Continue.
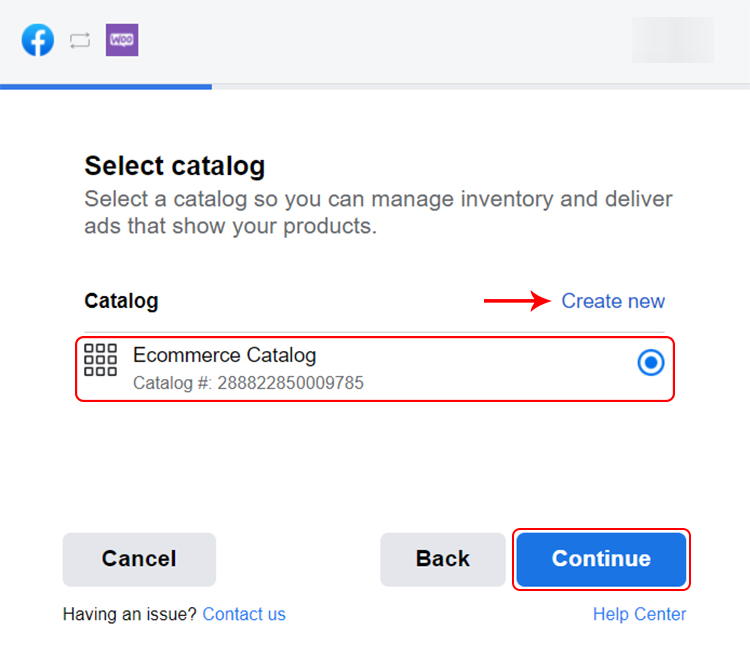
- Now, select an existing WooCommerce product catalog, then click Continue.
- To track the inventory between Facebook and WooCommerce, you need to select the Facebook Pixel. Hit the Continue button.
![]()
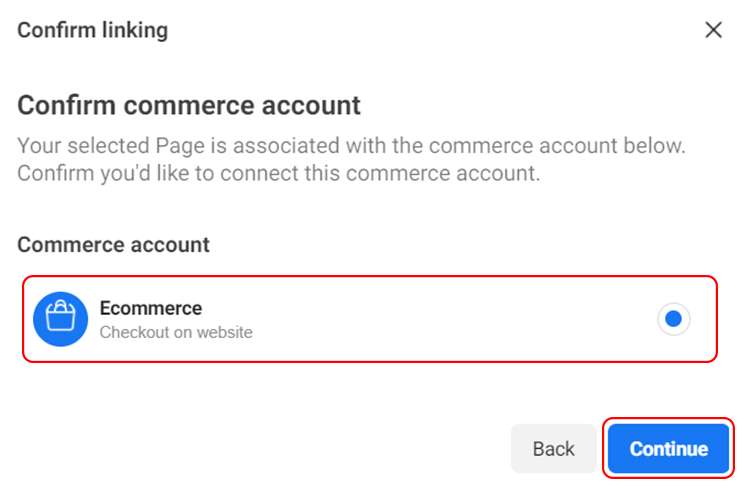
- Now, you need to confirm the Commerce Account. This account is responsible for featuring your products across Facebook and then clicking Continue.
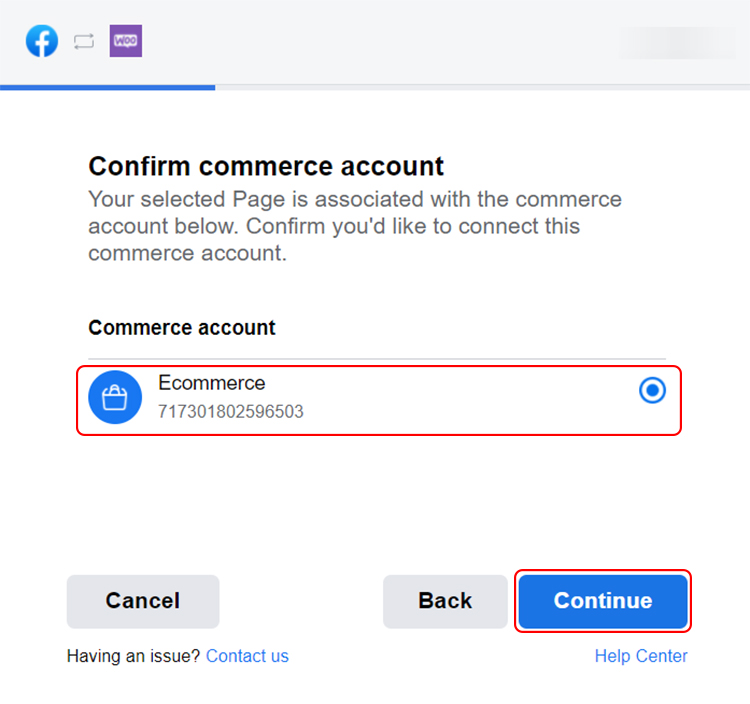
- You just need to confirm the setting. Click on the Continue button.

- You’ll redirect to the next screen, where you’ll ask to allow specific actions. I leave it default and click on the Next button.

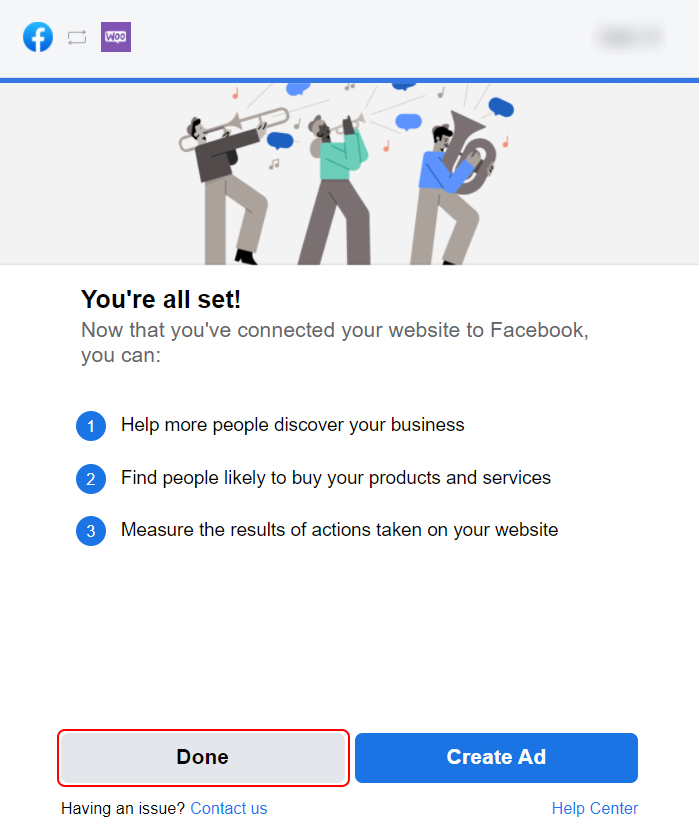
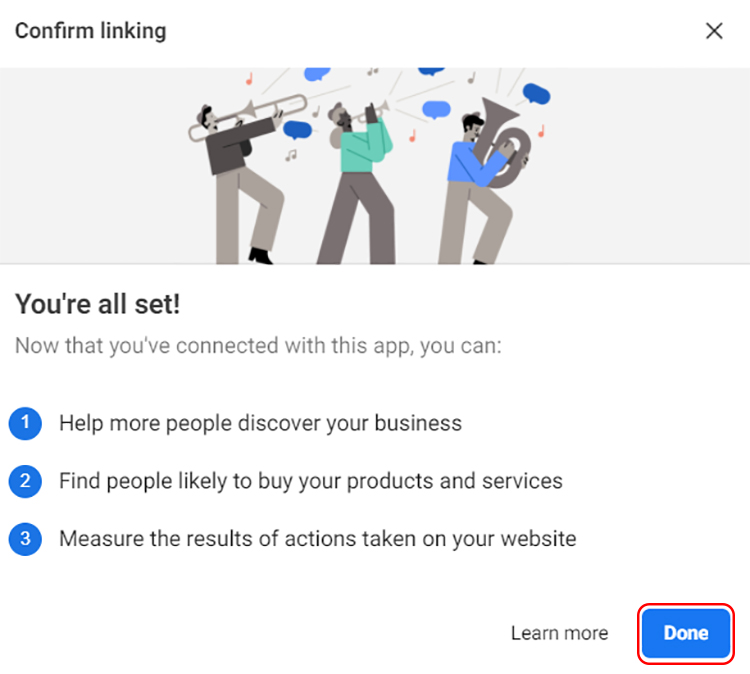
- In the next screen, you are all set and you have connected your WooCommerce store to Facebook. Now, click on Done.
Note: It’s possible you’ll get an error at this point – many users report errors continuing the integration. You don’t need to worry about that because the integration process you performed will be saved, so you can continue the integration process from the Facebook business account dashboard.
Integrate Facebook for WooCommerce via Facebook Business Account
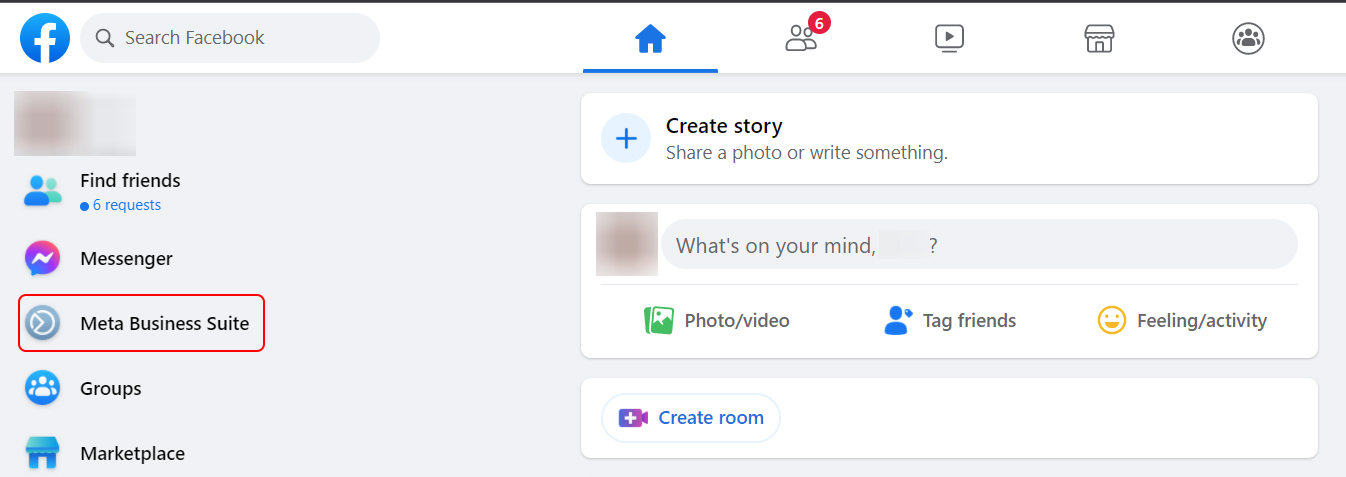
- Select the Meta Business Suite from your Facebook account.
- Now select the Business Apps from the More Tools option.

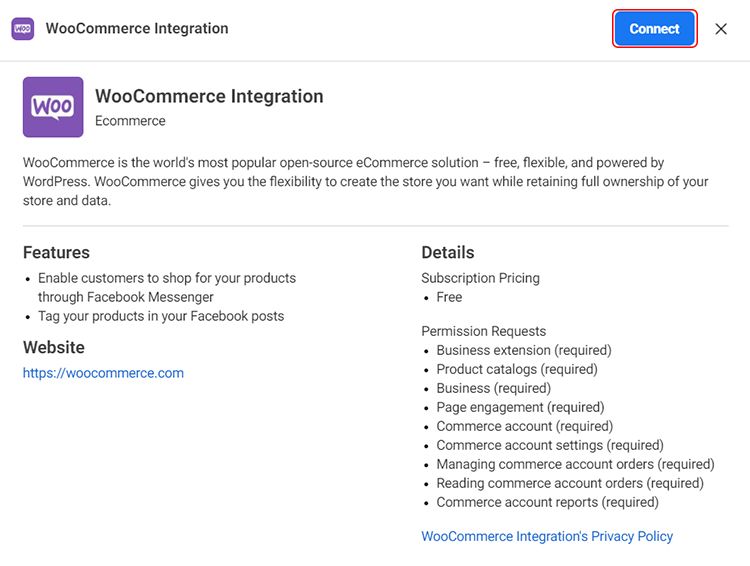
- Under the Ecommerce tab of Business Apps, click on the WooCommerce Integration.

- In the next screen, you’ll see the summarized details of WooCommerce and a button. Click on the Connect button.
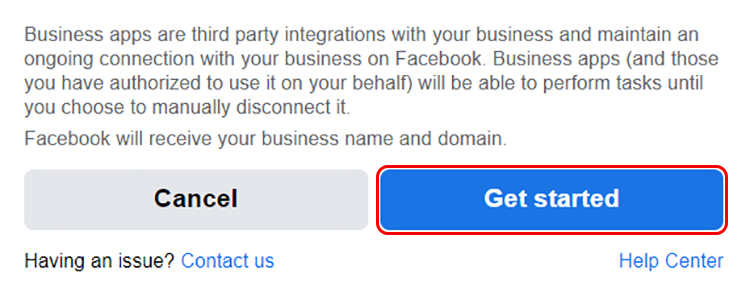
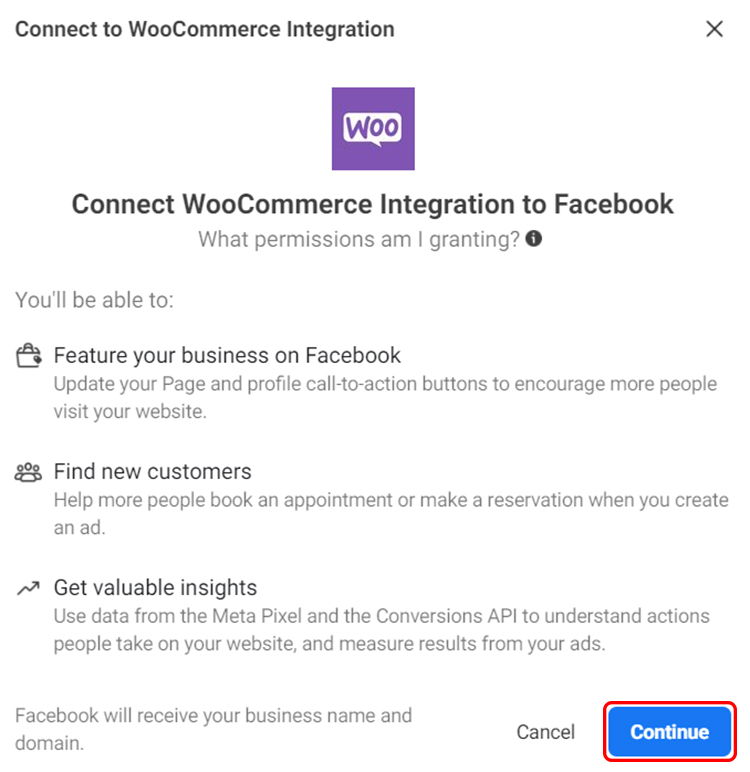
- This step requires permission from the user to connect WooCommerce integration to Facebook. Click on the Continue button.
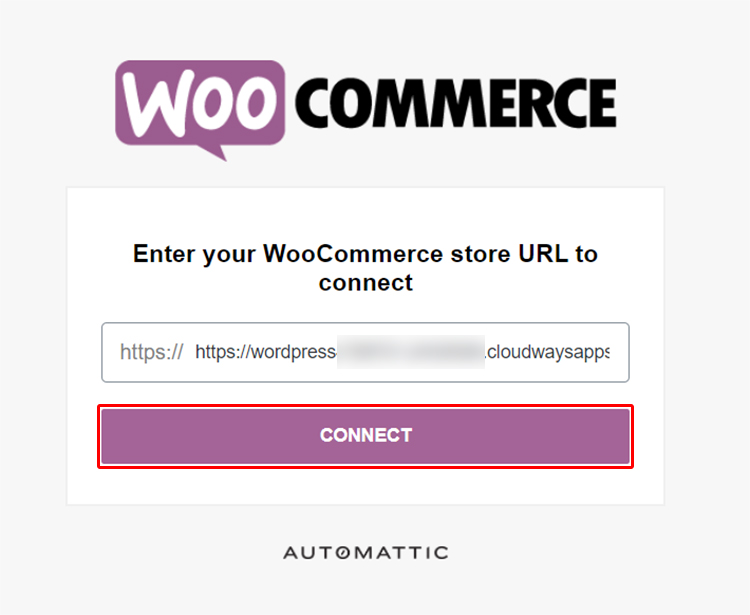
- You’ll redirect to the next screen, and here you have to enter your WooCommerce store URL to connect. Hit the CONNECT button after giving the URL.
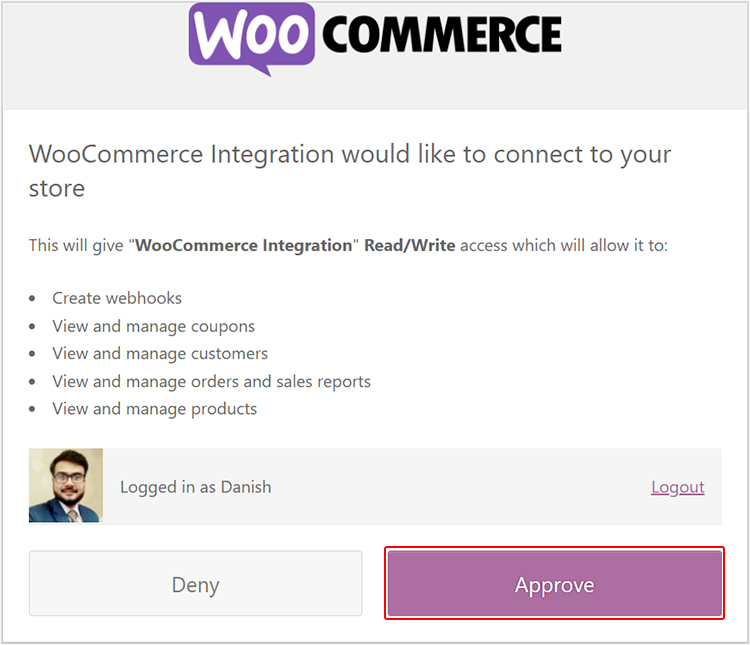
- After that, you will confirm the linking of your accounts. All you need to do is click Approve.
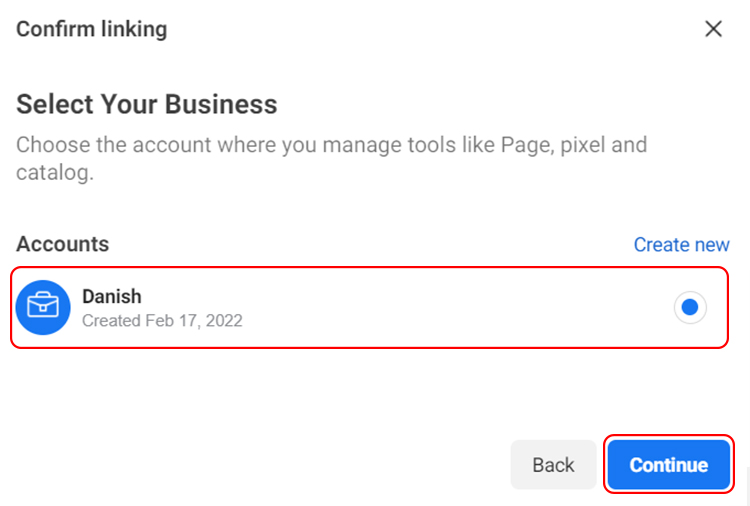
- Once you have approved the integration, select your Facebook Business account and click Continue.
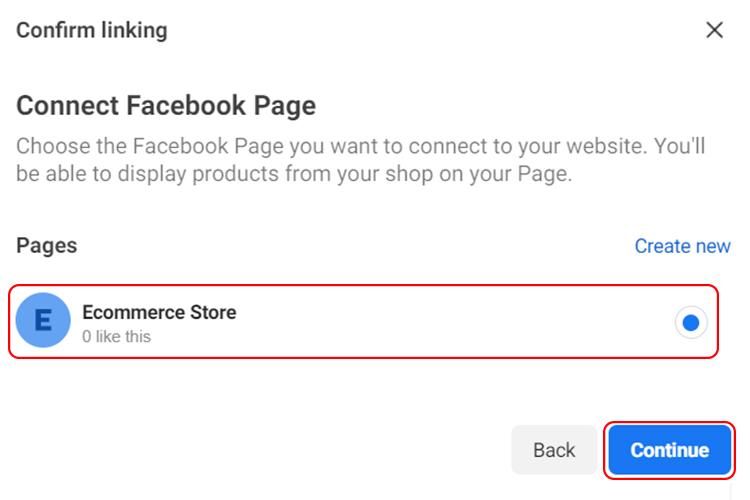
- Select the Facebook page you want to connect and click Continue.
- Connect your account to the Facebook Pixel for tracking and click Continue.
![]()
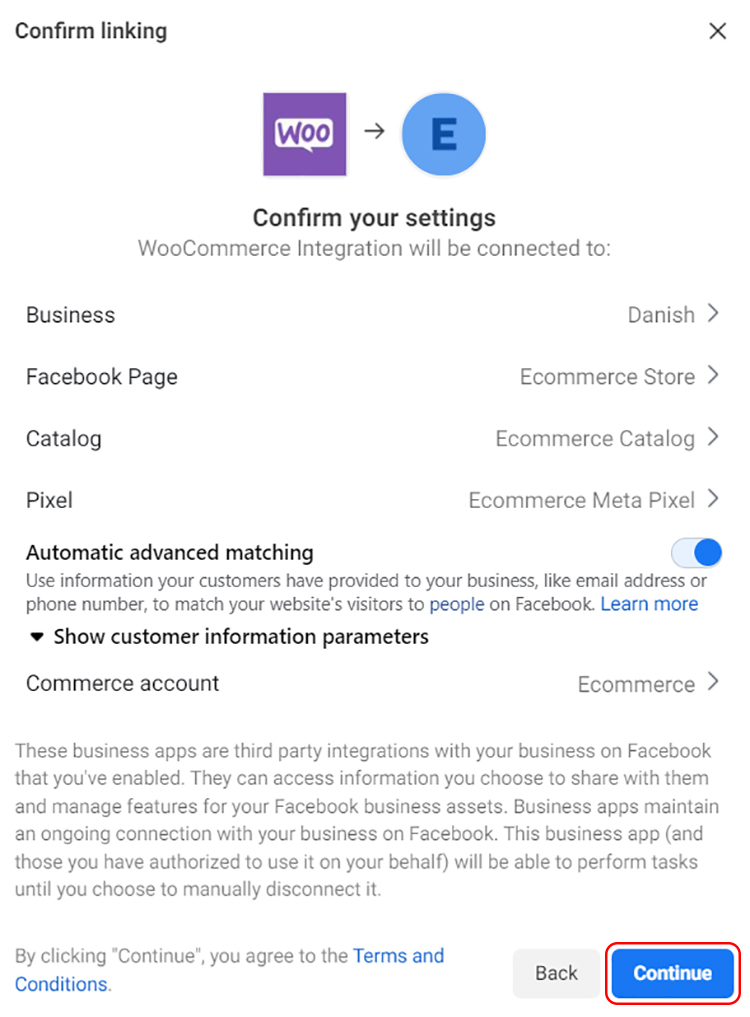
- The final step is to select the Commerce Account. You can allow your customers to checkout via Facebook, Instagram, or your website.
- The selection process is almost done. You just need to confirm the settings and click Continue.
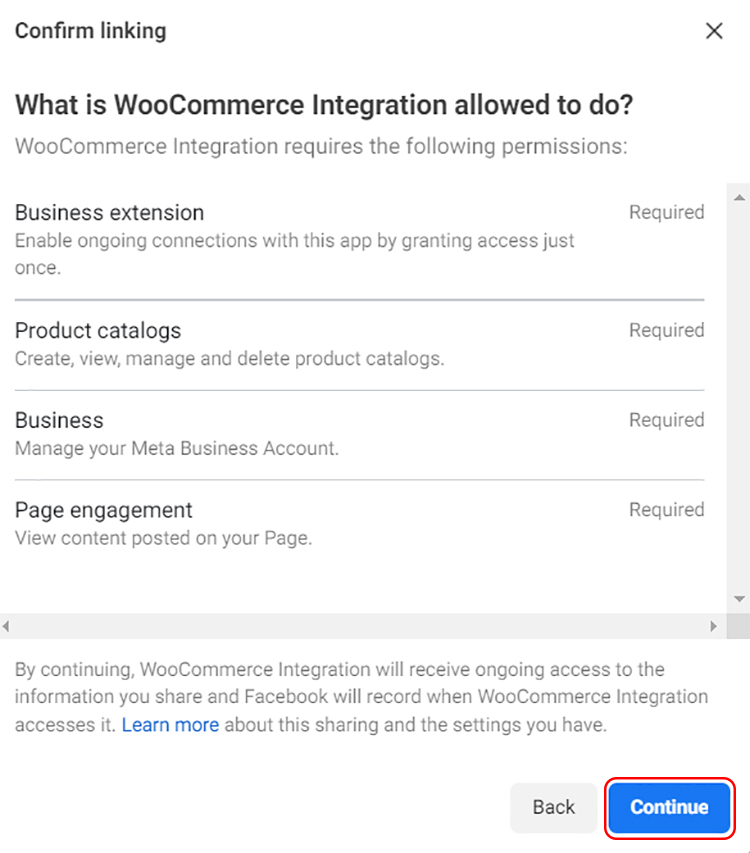
- The last step is to finalize the permissions that WooCommerce Integration requires. Simply click on the Continue button.
- Here you go. You are all set and your integration process is complete.

Summary
Facebook is one of the most popular platforms for marketing and advertising your brands and products. You know why? Because there are millions of people who use Facebook, and you can tap this huge unexplored market to increase your revenues.
To set up audience retargeting campaigns, you can install Facebook Pixel on your WooCommerce store. Here is the complete guide on Facebook Pixel and how you can integrate Facebook Pixel with your WooCommerce store.
That’s it! I hope you can now easily connect the WooCommerce store to a corresponding Facebook store and see your sales go through the roof. If you need help, just drop me a line in the comments section. I will get back to you with a solution.
Comments
Post a Comment