Google Maps in HTML, ASP.NET, PHP, JSP
The Article will guide you with complete knowledge of how to add a google map in your webpage with knowledge of JAVASCRIPT, Use of Geocoder, Use of InfoWindow, Use of Marker, Tabbed Markers, Maximising marker, Creating context menu, streetview in your map
Introduction
This article will guide you with a bit of knowledge about use of javascript, and more precisely will enable you to use Google Maps to your webpage with ease. Google brought web services that anyone can connect to and use their services without any cost. Well, there is some restriction to the use of gmap. They have two versions of maps, one for standard purpose which will come for free, and another one is Google map Enterprise Solution.
Well Simply if you want to add a google map to your website and which can be seen from anywhere outside, means can be accessible to just using a link, you dont need to pay google for using their API. But if you want to restrict access to maps behind a valid login, then you need to pay google. I am using simple HTML page for adding up gmap. And later on I will use others also to make the gmap look very lively.
The only thing that you need in case of using gmap to your application is an google account. You can sign up for an account for free. Just go here.
You could sign up for an account for free, and then you can use google maps to your website by clicking on "Create an account now". After you create an account just use your userid and password to login when required.
Background
For using Google Maps in your website the thing you need is a bit of knowledge of javascript, means how to call a function from web controls. I will describe everything, but you need to catch up all those.
Sample examples
I am creating an HTML page for implementing this project. You can use any projects to implement maps dynamically using any server side languages.
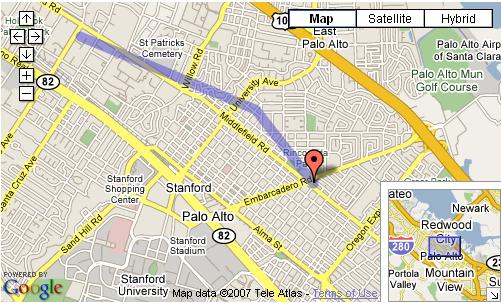
EXAMPLE 1 : Getting Started
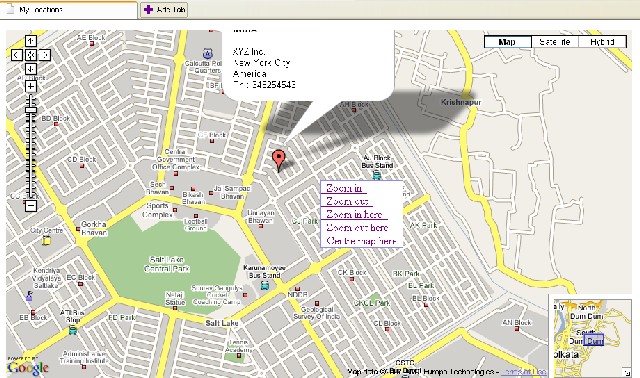
//Use of Gmap in your web page//<!DOCTYPE html PUBLIC "-//W3C//DTD XHTML 1.0 Strict//EN""http://www.w3.org/TR/xhtml1/DTD/xhtml1-strict.dtd"><html xmlns="http://www.w3.org/1999/xhtml"><head><meta http-equiv="content-type" content="text/html; charset=utf-8"/><title>My Locations</title><script src="http://maps.google.com/maps?file=api&v=2&key=ABQIAAAAcl" type="text/javascript"></script><script type="text/javascript">function load()if (GBrowserIsCompatible()) {{var point;var map=new GMap2(document.getElementById("map"));map.addControl(new GOverviewMapControl());map.enableDoubleClickZoom();map.enableScrollWheelZoom();map.addControl(new GMapTypeControl());map.addControl(new GSmallMapControl());var address='<img src="myimage.gif" width=150 height=40/><br/>' +<font size="2" face="Arial"><b>INDIA</b><br/><br/>Home.<br/>' +New York City<br/><br/>America<br/>Ph.: 23743823</font>';var marker = new GMarker(point);map.setCenter(point,17);map.setMapType(G_HYBRID_MAP);map.addOverlay(marker);marker.openInfoWindowHtml(address);});GEvent.addListener(marker, "click", function() {</script>marker.openInfoWindowHtml(address); } }<body onload="load();" onunload="GUnload()" style="background-color:Transparent"><div id="map" style="width: 900px; height: 500px"></div></body></html>
Coming to the code, first in your webpage you need to add one
<div> where we are going to load the google map. I have taken a div similar to that and named it as "map". The width and height will specify how much the size of the page will be.<div id="map" style="width: 900px; height: 500px"></div>
Now I have called a javascript function when body loads, thus, in my sample application, as soon as the page comes to your browser, you will see a gmap loaded. So I have created a javascript load function which will be called as soon as I open the webpage. Now during the page load, we have added a dynamic javascript file which will be dependent on webhost. The line...
<script src="http://maps.google.com/maps?file=api&v=2&key=ABQIAAAAcl" type="text/javascript"></script
...adds up a file from Google. This is essential, because that file will create the entire map for you. Just one thing that you need is to generate an API KEY for your web host. Be it local host, use http://localhost to it. Just click below and get the key.
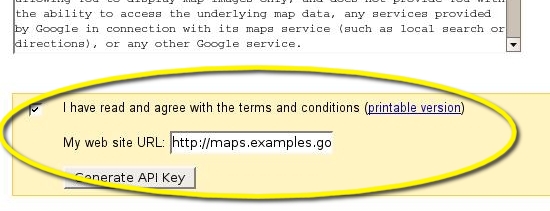
You will get a key from here, just replace the key in the key attribute of the javascript line.
After you do that, I have used
GBrowserIsCompatible(), its a function which will return true only if your browser is compatible with gmap. The next line will load the gmap control to the div control. GMap2 function takes the control to load and returns a map object which can be referenced later on. Next map.addControl(new GOverviewMapControl()); will add a new control to the map, called GOverviewMapControl
it will be an overview of the map just in the right hand bottom corner to the map.
I can add more controls through addControl Function. I have used
GSmallMapControl() to add a zoom control to the map, and also new
 GMapTypeControl() as new map type control in a similar way. There are mainly 3 types of map, one is Normal, Satellite and Hybrid. Those options could be found on your map.
The
enableDoubleClickZoom and enableScrollWheelZoom will enable those features simply to your map.
After that, I have placed a marker to my application. Markers are images that can be placed over the map to point a location. To place a marker you need a latitude and longitude which should be passed throught
GLatLng() function to get a valid point. I have also made an html that could be shown to the map. I have let a var address to store the html. Later on I have created a marker into the map using those latitude and longitude. The GMarker will create one marker and addOverlay() will add the marker in the form.
The
GEvent.addListener will add one listener to the map through which the map respond. I have added a click event listener to my map, so that when one clicks on the map, it will show the InfoWindow of the marker. openInfoWindowHtml() will open the info window html for me. Thats all. You have created a simple map and added to your html page.
Take a look at the snapshot:
EXAMPLE 2 : Create Polylines on Custom Map
Now let us make it more advanced adding polylines to it.
<!DOCTYPE html PUBLIC "-//W3C//DTD XHTML 1.0 Transitional//EN""http://www.w3.org/TR/xhtml1/DTD/xhtml1-strict.dtd"><html xmlns="http://www.w3.org/1999/xhtml"xmlns:v="urn:schemas-microsoft-com:vml"><head><title>Untitled Page</title><script src="http://maps.google.com/maps?file=api&v=2&key=ABQIA" type="text/javascript"></script><script type="text/javascript">function loadEarth(mapdiv) {if (GBrowserIsCompatible()) {var point;if(!mapdiv)return true;var map=new GMap2(document.getElementById("map"));map.addControl(new GOverviewMapControl());map.enableDoubleClickZoom();map.enableScrollWheelZoom();map.addControl(new GMapTypeControl());map.addControl(new GSmallMapControl());var marker = new GMarker(new GLatLng(37.4419,-122.1419));map.setCenter(new GLatLng(37.4419,-122.1419),17);GEvent.addListener(marker, "click", function() {marker.openInfoWindowHtml("hii");});map.addOverlay(marker);map.setCenter(new GLatLng(37.4419, -122.1419), 16);map.setMapType(G_SATELLITE_MAP);var polyline = new GPolyline([new GLatLng(37.4419, -122.1419),new GLatLng(37.4519, -122.1519),new GLatLng( 37.4619, -122.1819)], "#3333cc", 10);}map.addOverlay(polyline);}</script></head><body onload="loadEarth('map')" onunload="GUnload()" style="background-color:Transparent"><div id="map" style="width: 500px; height: 300px"></div></body></html>
In the above example I have taken 3 points just after creation of markers and drawn polyline over those points.
GPolyline() will create a polyline object using an array of points, with a specific color, here I have taken the color using hexadecimal code and the width, which is 10 here. After that I have used addOverlay function to add the polyline to our actual map.
Remember to add the vml namespace in case of using polylines. We also need to use strict DTD standard to show polylines on the map.
<!DOCTYPE html PUBLIC "-//W3C//DTD XHTML 1.0 Transitional//EN""http://www.w3.org/TR/xhtml1/DTD/xhtml1-strict.dtd"><html xmlns="http://www.w3.org/1999/xhtml"xmlns:v="urn:schemas-microsoft-com:vml">
Otherwise the polyline will not be shown to your map. Take a look at the snapshot:
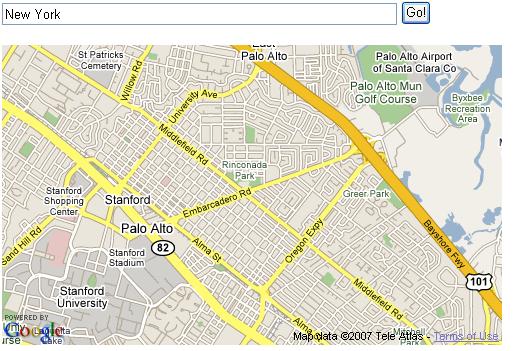
EXAMPLE 3: Geocode Address for Lat/Lon
In my next example I would use
Geocoder functionality to my map, so that you could search any address from a search textbox, and the geocoder will search those address for you.<!DOCTYPE html PUBLIC "-//W3C//DTD XHTML 1.0 Strict//EN""http://www.w3.org/TR/xhtml1/DTD/xhtml1-strict.dtd"><html xmlns="http://www.w3.org/1999/xhtml"><head><meta http-equiv="content-type" content="text/html; charset=UTF-8"/><title>Coder Page</title><script src="http://maps.google.com/maps?file=api&v=2&key=ABQIAA"type="text/javascript"></script><script language="'Javascript'" type='text/javascript'>var map = null;var geocoder = null;function load() {if (GBrowserIsCompatible()) {map = new GMap2(document.getElementById("map"));map.setCenter(new GLatLng(37.4419, -122.1419), 13);geocoder = new GClientGeocoder();} }function showAddress(address) {if (geocoder) {geocoder.getLatLng(address,function(point) {if (!point) {alert(address + " not found");} else {map.setCenter(point, 17);var marker = new GMarker(point);map.addOverlay(marker);marker.openInfoWindowHtml(address);} } ); }</script>}</head><body onload="load()" onunload="GUnload()"><input type="text" size="60" name="address" id="addr"value="India" /><input type="button" value="Go!"onclick="showAddress(document.getElementById("addr").value);return false"/></p><div id="map" style="width: 500px; height: 300px"></div></body></html>
In the above example I have added another function that will enable us to call any address and the address will be replaced with a point in terms of latitude and longitude. The
GClientGeocoder() will return a geocode object to the client browser which could be later used to get a point from any text address. Google have approximated this search will take 1.73 seconds for each geocode call. So its not that much slow. Now for searching an address I have created a button and a textbox, which will be used to get address from the user. The showaddress function will take one address from the user and create a marker just into that location, and open the infowindow of that marker. If no points are found, it returns an alert. So on clicking the button it will call the showaddress function, and it will show the location.
Look at the SnapShot of what we built so far:
Example 4 : Create Context Menu
Well, In my next example, I am adding an example that can demonstrate the use of gmap in a better way. I am adding context menu. See the code first:
var map = null;var geocoder = null;var contextmenu;if (GBrowserIsCompatible()) {function load(loc) { var point;map=new GMap2(document.getElementById("map"));map.addControl(new GOverviewMapControl()); map.enableDoubleClickZoom();map.addControl(new GLargeMapControl());map.enableScrollWheelZoom(); map.addControl(new GMapTypeControl()); createContextMenu(map);var address='<font size="2" face="Arial"><b>INDIA</b><br/><br/>XYZ Inc.<br/>New York City <br/>America<br/>Ph.: 343254543</font>';point = new GLatLng(22.592057,88.421815);map.setCenter(point,17);var marker = new GMarker(point);map.setMapType(G_HYBRID_MAP);map.addOverlay(marker); GEvent.addListener(marker,marker.openInfoWindowHtml(address);"click", function() {marker.openInfoWindowHtml(address);}); } } function createContextMenu(map)contextmenu.style.background="#ffffff";{ contextmenu = document.createElement("div"); contextmenu.style.visibility="hidden";contextmenu.innerHTML = '<a href="javascript:zoomIn()">contextmenu.style.border="1px solid #8888FF";<div class="context"> Zoom in </div></a>'+ '<a href="javascript:zoomOut()"><div class="context"> Zoom out </div></a>'+ '<a href="javascript:zoomInHere()"><div class="context"> Zoom in here </div></a>'+ '<a href="javascript:zoomOutHere()"><div class="context"> Zoom out here </div></a>'+ '<a href="javascript:centreMapHere()"><div class="context"> Centre map here </div></a>';map.getContainer().appendChild(contextmenu);GEvent.addListener(map,"singlerightclick",function(pixel,tile){ clickedPixel = pixel; var x=pixel.x;if (x > map.getSize().width - 120)var y=pixel.y; { x = map.getSize().width - 120y = map.getSize().height - 100} if (y > map.getSize().height - 100) { }pos.apply(contextmenu);var pos = new GControlPosition(G_ANCHOR_TOP_LEFT, new GSize(x,y)); contextmenu.style.visibility = "visible"; });map.zoomIn();GEvent.addListener(map, "click", function() { contextmenu.style.visibility="hidden"; }); } function zoomIn() {function zoomInHere()contextmenu.style.visibility="hidden"; } function zoomOut() { map.zoomOut(); contextmenu.style.visibility="hidden"; } {var point = map.fromContainerPixelToLatLng(clickedPixel)var point = map.fromContainerPixelToLatLng(clickedPixel) map.zoomIn(point,true); contextmenu.style.visibility="hidden"; } function zoomOutHere() { map.setCenter(point,map.getZoom()-1);}contextmenu.style.visibility="hidden"; } function centreMapHere() { var point = map.fromContainerPixelToLatLng(clickedPixel) map.setCenter(point);contextmenu.style.visibility="hidden";
In this example I have added a custom div control when the user right clicks anywhere in the map. The event that should be registered when user right clicks the map is
GEvent.addListener(map,"singlerightclick",function(pixel,tile) , I have created on the same point where the right click occurs, by getting the points from pixel. The div have some function calls when option is clicked. Those calls the map.zoomIn, ZoomOut functions. The container is set to hidden when the option works just to eliminate the custom div control from the map.
Check the snapshot:
Example 5 : Tabbed Infowindow with Maximize capability
Well in this example I will give you idea about how to create tabbed info window and also an option to maximize the
infowindow so that you can show a webpage within it. Just take a look at the code below:var map = null;var geocoder = null;function load(loc) {if (GBrowserIsCompatible()) {var point;var map=new GMap2(document.getElementById("map"));map.addControl(new GOverviewMapControl());map.enableDoubleClickZoom();map.addControl(new GMapTypeControl());map.enableScrollWheelZoom();var address='<font size="2" face="Arial"><b>INDIA</b><br/><br/>map.addControl(new GSmallMapControl());XYZ Inc.<br/>New York City <br/>America<br/>Ph.: 343254543</font>';point = new GLatLng(22.592057,88.421815);var marker = new GMarker(point);map.setCenter(point,17);map.addOverlay(marker);map.setMapType(G_HYBRID_MAP);GEvent.addListener(marker, "click", function() {marker.openInfoWindowTabsHtml([new GInfoWindowTab("BASIC",address),new GInfoWindowTab("Advanced","<b>Dont forget to click on<br/>Maximize button on this window with + sign</b>")],{maxUrl:"http://dotnetricks.blogspot.com"});});}}
Well, you can see the line
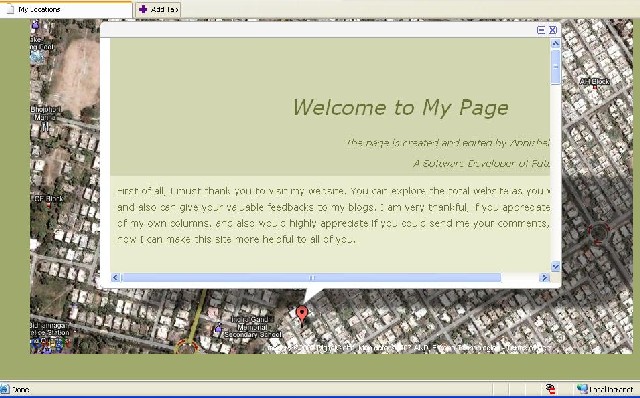
GEvent.addListener where instead of calling openInfoWindow we are calling openInfoWindowTabsHtml. This function will enable us to create a tabbed window. The arguments are array of Tabs that could be found from GInfoWindowTab, which takes two arguments, first one is header, and the second is the content in html. The second argument of openInfoWindowTabsHtml is options, where I have used maxUrl option, which will create a maximize button on the window. I can use this option in normal markers too. Now lets look at the snapshots: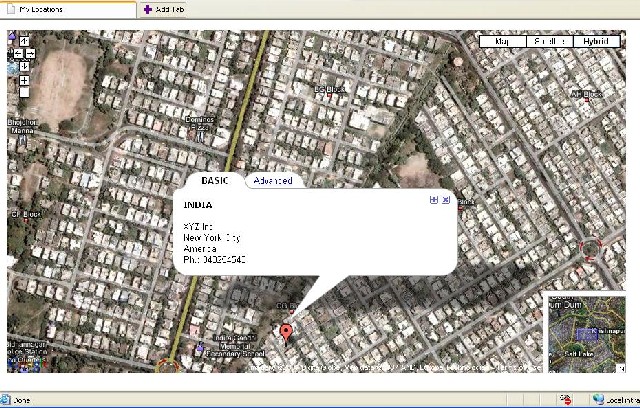
This window is showing the tabbed window with two tabs,1. Basic and 2. Advanced. When You click on the + button just beside the Close button, It will open an html window within the gmap. See the snapshot:
Example 6 : Trap Client Events for data
In this demo I will be using a new event handler called Dragend and moveend handler. Take a look at the simple code :
<script type="text/javascript">function load() {if (GBrowserIsCompatible()) {var map = new GMap2(document.getElementById("map"));map.addControl (new GSmallMapControl());map.addControl(new GMapTypeControl());var center = new GLatLng(-22.98699983834975, -43.210344314575195);map.setCenter(center, 11);map.setMapType(G_SATELLITE_MAP);geocoder = new GClientGeocoder();var marker = new GMarker(center, {draggable: true});map.addOverlay(marker);document.getElementById("lat").value = center.lat();document.getElementById("lng").value = center.lng ();geocoder = new GClientGeocoder();GEvent.addListener(marker, "dragend", function() {var point =marker.getPoint();map.panTo(point);document.getElementById("lat").value = point.lat();document.getElementById("lng").value = point.lng();});GEvent.addListener(map, "moveend", function() {map.clearOverlays();var center = map.getCenter();var marker = new GMarker(center, {draggable: true});map.addOverlay(marker);document.getElementById ("lat").value = center.lat();document.getElementById("lng").value = center.lng();GEvent.addListener(marker, "dragend", function() {var point =marker.getPoint();map.panTo(point);document.getElementById("lat").value = point.lat();document.getElementById("lng").value = point.lng();}); }); } }function showAddress(address) {var map = new GMap2(document.getElementById("map"));map.addControl(new GSmallMapControl());map.addControl(new GMapTypeControl());if (geocoder) {geocoder.getLatLng (address,function(point) {if (!point) {alert(address + " city not found !");}else {document.getElementById("lat").value = point.lat();document.getElementById("lng").value = point.lng();map.clearOverlays()map.setCenter(point, 14);var marker = new GMarker(point, {draggable: true});map.addOverlay(marker);GEvent.addListener(marker, "dragend", function() {var pt =marker.getPoint();map.panTo(pt);document.getElementById("lat").value = pt.lat();document.getElementById("lng").value = pt.lng();});GEvent.addListener(map, "moveend", function() {map.clearOverlays();var center = map.getCenter();var marker = new GMarker(center, {draggable: true});map.addOverlay(marker);document.getElementById ("lat").value = center.lat();document.getElementById("lng").value = center.lng();GEvent.addListener(marker, "dragend", function() {var pt =marker.getPoint();map.panTo(pt);document.getElementById("lat").value = pt.lat();document.getElementById("lng").value = pt.lng();}); }); }} ); }}</script
In this example when the use drags the map, it will automatically place coordinates to the form text boxes called lat and lng. To do this, I have made an overlay marker, and then retrieved the point using getPoint() function.
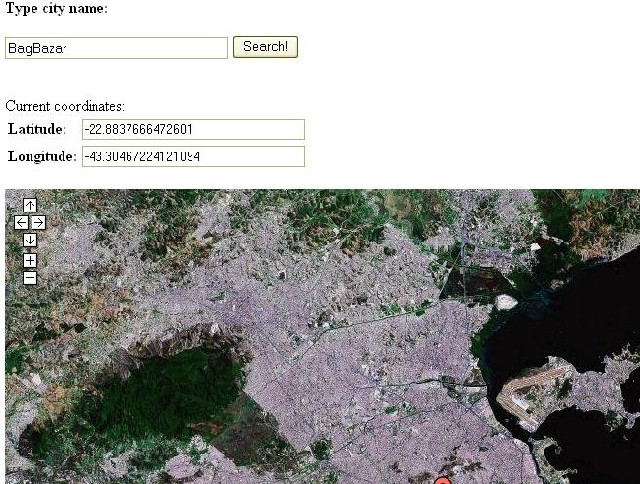
This is a simple example .. Just a demo. I have also included the geocoder, so that one can also search for a location.
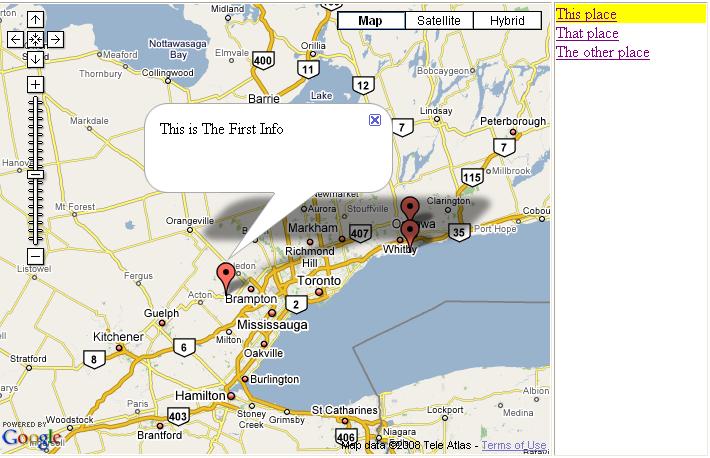
EXAMPLE 7 : MarkerManager and Sidebar
In this example you will be using
MarkerManager and Sidebar to display marker links.
The Marker Manager of Google is used to manage large number of markers. See the example below.
<!DOCTYPE html PUBLIC "-//W3C//DTD XHTML 1.0 Strict//EN""http://www.w3.org/TR/xhtml1/DTD/xhtml1-strict.dtd"><html xmlns="http://www.w3.org/1999/xhtml"><head><title>Google Maps</title><script src="http://maps.google.com/maps?file=api&v=2&key=ABQIAAAAclK0B2lXQwV5lPy1rLiTFBSN1aiKepvDswXjKa4j2DDWdYvOjhQMO1tywqS8ObgP5dtO70AyyArhzA" type="text/javascript"></script></head><body onunload="GUnload()"><!-- you can use tables or divs for the overall layout --><table border=1><tr><td><div id="map" style="width: 550px; height: 450px"></div></td><td width = 150 valign="top" style="text-decoration: underline; color: #4444ff;"><div id="side_bar"></div></td></tr></table><script type="text/javascript">//<![CDATA[if (GBrowserIsCompatible()) {// this variable will collect the html which will eventually be placed// in the side_barvar side_bar_html = "";// arrays to hold copies of the markers and html used by the side_bar// because the function closure trick doesnt work therevar gmarkers = [];var i = 0;var lastlinkid;// A function to create the marker and set up the event windowfunction createMarker(point,name,html) {var marker = new GMarker(point);var linkid = "link"+i;GEvent.addListener(marker, "click", function() {marker.openInfoWindowHtml(html);document.getElementById(linkid).style.background="#ffff00";lastlinkid=linkid;});// save the info we need to use later for the side_bargmarkers[i] = marker;// add a line to the side_bar htmlside_bar_html += '<div id="'+linkid+'"><a href="javascript:Linkclicked(' + i + ')">'+ name + '</a><br></div>';i++;return marker;}// This function picks up the click and opens the corresponding info windowfunction Linkclicked(i) {GEvent.trigger(gmarkers[i], "click");}// create the mapvar map = new GMap2(document.getElementById("map"));map.addControl(new GLargeMapControl());map.addControl(new GMapTypeControl());map.setCenter(new GLatLng( 43.907787,-79.359741), 8);var mm = new GMarkerManager(map);// add the pointsvar point = new GLatLng(43.65654,-79.90138);var marker = createMarker(point,"This place","This is The First Info")var point = new GLatLng(43.91892,-78.89231);var marker = createMarker(point,"That place","This is The Second Info")var point = new GLatLng(43.82589,-78.89231);var marker = createMarker(point,"The other place","This is The Third Info")GEvent.addListener(map,"infowindowclose", function() {document.getElementById(lastlinkid).style.background="#ffffff";});mm.addMarkers(gmarkers,0,17);mm.refresh();// put the assembled side_bar_html contents into the side_bar divdocument.getElementById("side_bar").innerHTML = side_bar_html;}else {alert("Sorry, the Google Maps API is not compatible with this browser");}//]]></script></body></html>
Here I have placed one marker manager and an array. I have put all the markers to the markermanager so that it can be refreshed deleted or added later. The links are created using the array and is properly mapped with correct marker. Check out the link
EXAMPLE 8 : Drawing custom Markers
It is a common problem of making background color of a info window to be changed to a custom color. General sense, you can make the background of one div to a color, but it will not change the extreme boundaries of the info window. So I have extended
Tom Morgans Marker to create a marker that looks entirely different from the markers in common. Take a look at the example: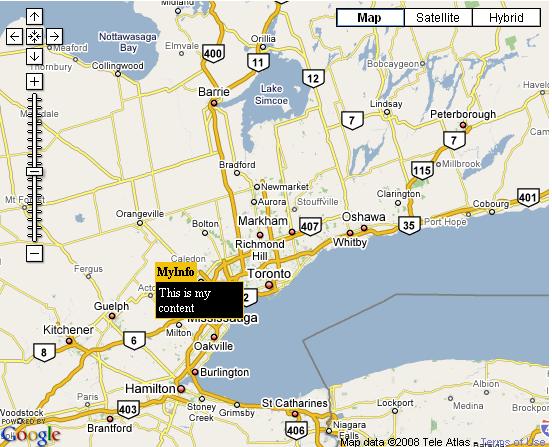
To use Tom Morgans Marker just download this javascript from here : Click here
Here is the code below:
<!DOCTYPE html PUBLIC "-//W3C//DTD XHTML 1.0 Strict//EN""http://www.w3.org/TR/xhtml1/DTD/xhtml1-strict.dtd"><html xmlns="http://www.w3.org/1999/xhtml" xmlns:v="urn:schemas-microsoft-com:vml"><head><meta http-equiv="content-type" content="text/html; charset=UTF-8"/><title>Google Maps</title><script src="http://maps.google.com/maps?file=api&v=2&key=ABQIAAAAclK0B2lXQwV5lPy1rLiTFBSN1aiKepvDswXjKa4j2DDWdYvOjhQMO1tywqS8ObgP5dtO70AyyArhzA" type="text/javascript"></script><script src="tlabel.2.05.js" type="text/javascript"></script></head><body onunload="GUnload()"><div id="map" style="width: 550px; height: 450px"></div><script type="text/javascript">//<![CDATA[if (GBrowserIsCompatible()) {var openbubble=true;var agent = navigator.userAgent.toLowerCase();// For IE We need to Do thisif ((agent.indexOf("msie") > -1) && (agent.indexOf("opera") < 1)){var loader = "filter:progid:DXImageTransform.Microsoft.AlphaImageLoader(src='gmarker.png', sizingMethod='crop');";icon = '<div style="height:34px; width:20px; ' +loader+ '" ></div>'}var n=0;function createTLabel(point,html) {var label = new TLabel();label.id = 'Label '+n;label.anchorLatLng = point;label.anchorPoint = 'bottomCenter';label.content = html;label.markerOffset = new GSize(-1,-5);map.addTLabel(label);var obj=document.getElementById(label.id);GEvent.addDomListener(obj, "click", function() {//map.openInfoWindowHtml(point, html, {pixelOffset: new GSize(0,-34)} );});n++;var map = new GMap2(document.getElementById("map"));}map.addControl(new GLargeMapControl());map.addControl(new GMapTypeControl());map.setCenter(new GLatLng(43.907787,-79.359741),8);// Creating the HTML to show markersvar hContent = '<div style="padding: 0px 0px 13px 0px; background: url(images/pt_bot_ctr_ora.png) no-repeat bottom center;"><div style="text-align: center; background-color: #f2c30c; padding: 2px;font-size: 0.75em; font-weight: bold;" onclick="openInfo(\'hInfo\')">MyInfo</div>';hContent+='<div id="hInfo" style="position: absolute; display: none;">';hContent+='<div style="width: 81px; background-color: #000; padding: 3px;font-size: 0.75em; color: #fff; text-align: left; border: 1px solid #f2c30c;">This is my content</div>';hContent+='</div></div>';createTLabel(new GLatLng(43.65654,-79.90138),hContent);}else {alert("Sorry, the Google Maps API is not compatible with this browser");}function openInfo(d){var obj = document.getElementById(d);if(openbubble==true){obj.style.display="block";openbubble=false;}else{obj.style.display="none";openbubble=true;}}//]]></script></body></html>
You can use Gmarker array to store the lebels for future reference, and also you can add one event to the map so that each open marker hides through a loop.
Example 9: Invoke AJAX from GMAP & GPolygon
In this example I am giving you a brief Idea of
XMLhttpRequest and Drawing GPolygons.
First of all look at the example and Code Below. I am explaining them after that.
<!DOCTYPE html PUBLIC "-//W3C//DTD XHTML 1.0 Strict//EN""http://www.w3.org/TR/xhtml1/DTD/xhtml1-strict.dtd"><html xmlns="http://www.w3.org/1999/xhtml"><head><meta http-equiv="content-type" content="text/html; charset=utf-8" /><title>Polygon Demo</title><script src="http://maps.google.com/maps?file=api&v=2&key=ABQIAAAAclK0B2lXQwV5lPy1rL"type="text/javascript"></script><script type="text/javascript">var map = null;var polys = [];var labels = [];var xmlDoc=null;function load(){if (GBrowserIsCompatible()){var point;map = new GMap2(document.getElementById("map"));map.addControl(new GLargeMapControl());map.addControl(new GMapTypeControl());map.setCenter(new GLatLng(42.16,-100.72),4);// Read the data from states.xmlvar request = GXmlHttp.create();request.open("GET", "states.xml", true);request.onreadystatechange = function(){if (request.readyState == 4){xmlDoc = GXml.parse(request.responseText);var states = xmlDoc.documentElement.getElementsByTagName("state");// read each linefor (var a = 0; a < states.length; a++){// get any state attributesvar label = states[a].getAttribute("name");var colour = states[a].getAttribute("colour");// read each point on that linevar points = states[a].getElementsByTagName("point");var stateoptions = document.getElementById("xmlStates");var optn = document.createElement("OPTION");optn.text = states[a].getAttribute("name");optn.value = states[a].getAttribute("name");stateoptions.options.add(optn);} } }request.send(null);}else {alert("Sorry, the Google Maps API is not compatible with this browser");}}function loadselectedpoint(){if(xmlDoc==null){alert('null');return;}var state = document.getElementById("xmlStates").value;var states = xmlDoc.documentElement.getElementsByTagName("state");for (var a = 0; a < states.length; a++){var label = states[a].getAttribute("name");var colour = states[a].getAttribute("colour");var points = states[a].getElementsByTagName("point");if(states[a].getAttribute("name")==state){var pts = [];for (var i = 0; i < points.length; i++){pts[i] = new GLatLng(parseFloat(points[i].getAttribute("lat")),parseFloat(points[i].getAttribute("lng")));}var poly =new GPolygon(pts,"#000000",1,1,colour,0.5,{clickable:true});GEvent.addListener(poly,'click',function(point){map.openInfoWindowHtml(point, "Polygon is clicked!!")});polys.push(poly);map.clearOverlays();map.addOverlay(poly);} }}//]]></script></head><body onload="load();" onunload="GUnload()" style="background-color: Transparent">States :<select id="xmlStates" onchange="loadselectedpoint()"></select><br /><br /><div id="map" style="width: 900px; height: 500px"></div></body></html>
In the above code, I have made one Select box, where all the States loads, upon selecting one state, it will display the entire boundary of the state. Please take a look at the demo below:

In the example above,I have used two new classes:
1. GXmlHttp : This class is the primary AJAX calling Class which creates an
XMLHttpRequest Object and places Asynchronous server calls. I have used this class to load the points from an external Xml File which is asynchronously called and downloaded from the server. I have used this file to load the markings and also to load the Select Control. The OnReadyStateChanged is an event for any XMLHttpRequest object that is triggered when state is changed to the object. The Readystate evaluates to 4 when the last call made is successful, and the response is transmitted to the responseText property.
2. GXml : Its a class provided by Google that enables you to parse XML in your application. I have used this class to manage the XML data that comes through AJAX calls.
3. GPolygon : This class is used to make an overlay to the map. The constructor takes 7 arguments. The first argument is for an array of points, which are the
GLatlng combinations. The second argument is the Color for Boundaries, 3rd for weight of border, 4th is color of border, 5th is the opacity of the border, 6th is fill color, and 7 th is the opacity of the fill color. You can also produce click event for the Polygon.Example 10 : StreetView with Maximize & Close Buttons
Recently a new addition is made to google map which allows us to view the actual street view of the Road. This is really interesting. It was there for quite a few months in maps.google.com and finally its been released to the API.
To invoke streetview in the map we need to create an object of
GStreetViewPanorama. The streetview loads the map in a flash object, so it is highly recommended to install latest version of flash player before you try out StreetView. Here is the code below :var street;function initialize() {var position = new GLatLng(42.345573,-71.098326);var opt = { latlng:position,enableFullScreen: true };street = new GStreetviewPanorama(document.getElementById("divp"), opt);GEvent.addListener(divp, "error", handleNoFlash);}function handleNoFlash(errorCode) {if (errorCode == FLASH_UNAVAILABLE) {alert("Error: Flash doesn't appear to be supported by your browser");else if (errorCode == NO_NEARBY_PANO) {alert("Error : StreetView is Unavailable for current location");}return;}}
In the code, we create an object of
GStreetViewPanorama by passing an object of div container where the panorama will be loaded. We pass Lat/Lon as option. enableFullScreen determines whether to show the maximise button to the panorama.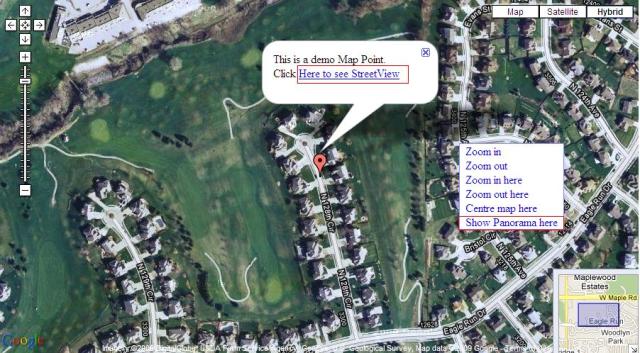
If you click on link in the marker window, it will open the Streetview which looks like :

If you click on the above pictures you can see the online demonstration of the feature. Just go to View-Source to find out the entire source code or you may download the source added with this article as well.
Here I have placed a marker with a link to show the StreetView of a selected point. You might also use the right-click context menu to show the
StreetViewPanorama of any point over the map.
Note :
StreetViewPanorama will not load if the point is not over a Road where PANO data is available. You might usevar gstclient = new GStreetviewClient();gstClient.getNearestPanoramaLatLng(new GLatLong(px,py), panoCallback));function panoCallback(point){//show panorama here.}
Thus you can make use of
panoCallback which recieves the nearest GLatLong point from the point passed in. Frequently Asked Questions
Guys, First of all I must thank you all for making this article a huge success. I got lots of mails from you everyday and love to answer them. Between them, I found some questions that are been asked to me very often. I want to discuss them with you so that I would have to answer less on your queries.
1. Where do I find XML file to Draw polygons in Example 9 ?
Ans : Actually the XML file is called using AJAX
XMLHttpRequest Object to the server. I have uploaded the file to my website. Please take a look at : - Download XML State List for US.
The data is taken from Cencus Bureau Data of US. If you need current data you need to login here and get the rescent changes (Of course of Govt officially modifies their site with recent changes)
2. How to Get Territory based on US Zip Codes?
Ans : US Zip Code data is also available from various sources. I have made a database on Cencus Data based on Zip locatiion so that one can easily use those data to create custom boundary from the Example 9 I gave you.
3. How to Measure Distance Between 2 Geo Points ?
Ans : To determine the distance between 2 geo points you can use two approaches.
First one is to get Actual Distance Between 2 geo points which could be calculated using Great Circle Formula. I have created one SQL server Function which will give you some idea on how to calculate this :
CREATE FUNCTION [dbo].[GETDISTANCE](@FIRSTLAT DECIMAL(17,7),@FIRSTLON DECIMAL(17,7),@SECONDLAT DECIMAL(17,7),@SECONDLON DECIMAL(17,7))RETURNS varchar(100) AS-- =============================================================================-- Author: <Author, Abhishek Sur, Codeproject.COM.>-- Create date: <Create Date,03/24/2008>-- Description: <Description,Returns Distance between two GEO Points-- on Great Circle>-- =============================================================================BEGINDECLARE@LONDIFF float,@a Bigint,@b float,@f float,@U1 float,@U2 float,@sinU1 float,@cosU1 float,@sinU2 float,@cosU2 float,@lambda float,@lambdaP float,@iterLimit Int,@sinLambda float,@cosLambda float,@sinSigma float,@cosSigma float,@sigma float,@alpha float,@cosSqAlpha float,@cos2SigmaM float,@C float,@uSq float,@CAPA float,@CAPB float,@deltaSigma float,@s floatif(abs(@FIRSTLAT) > 90 or abs(@FIRSTLON) > 180 or abs(@SECONDLAT) >90 orabs(@SECONDLON) > 180)return 'Not Valid Data'if(@FIRSTLAT = @SECONDLAT and @FIRSTLON = @SECONDLON)return '0 m'-- CONVERT TO RADIANset @FIRSTLAT = (@FIRSTLAT * 3.14159265358979)/180set @FIRSTLON = (@FIRSTLON * 3.14159265358979)/180set @SECONDLAT = (@SECONDLAT * 3.14159265358979)/180set @SECONDLON = (@SECONDLON * 3.14159265358979)/180set @LONDIFF = @SECONDLON - @FIRSTLONset @a = 6378137set @b = 6356752.3142set @f = 1/298.257223563SET @U1 = atan((1-@f) * tan(@FIRSTLAT))SET @U2 = atan((1-@f) * tan(@SECONDLAT))SET @sinU1 = sin(@U1)SET @cosU1 = cos(@U1)SET @sinU2 = sin(@U2)SET @cosU2 = cos(@U2)SET @lambda = @LONDIFFSET @lambdaP = 2 * PI()SET @iterLimit = 20while (abs(@lambda-@lambdaP) > 1.0E and @iterLimit > 0)BeginSET @iterLimit=@iterLimit-1SET @sinLambda = sin(@lambda)SET @cosLambda = cos(@lambda)SET @sinSigma = sqrt((@cosU2 * @sinLambda) * (@cosU2*@sinLambda) +(@cosU1*@sinU2-@sinU1*@cosU2*@cosLambda) * (@cosU1*@sinU2-@sinU1*@cosU2*@cosLambda))SET @cosSigma = @sinU1*@sinU2 + @cosU1*@cosU2*@cosLambdaSET @sigma = atan(@sinSigma/@cosSigma)SET @alpha = asin(@cosU1 * @cosU2 * @sinLambda / @sinSigma)SET @cosSqAlpha = cos(@alpha) * cos(@alpha)SET @cos2SigmaM = @cosSigma - 2*@sinU1*@sinU2/@cosSqAlphaSET @C = @f/16*@cosSqAlpha*(4+@f*(4-3*@cosSqAlpha))SET @lambdaP = @lambdaSET @lambda = @LONDIFF + (1-@C) * @f * sin(@alpha) *(@sigma + @C * @sinSigma * (@cos2SigmaM+ @C* @cosSigma*(-1+2*@cos2SigmaM*@cos2SigmaM)))ENDif (@iterLimit=0)return 'Not Valid Data' -- formula failed to convergeSET @uSq = @cosSqAlpha*(@a*@a-@b*@b)/(@b*@b)SET @CAPA = 1 + @uSq/16384*(4096+@uSq*(-768+@uSq*(320-175*@uSq)))SET @CAPB = @uSq/1024 * (256+@uSq*(-128+@uSq*(74-47*@uSq)))SET @deltaSigma = @CAPB*@sinSigma*(@cos2SigmaM+@CAPB/4*(@cosSigma*(-1+2*@cos2SigmaM*@cos2SigmaM) - @CAPB/6*@cos2SigmaM*(-3+4*@sinSigma*@sinSigma)*(-3+4*@cos2SigmaM*@cos2SigmaM)))SET @s = @b*@CAPA*(@sigma-@deltaSigma)declare @dist floatdeclare @retval floatSET @dist = @s / 1000;if (@dist < 1)beginset @retval = round(1000 * @dist,3)--set @retval = @retval * 1.0936133return Convert(varchar,(@retval)) + ' Metres'endelsebeginset @retval = round(1000 * @dist,3)/1000set @retval = round(@retval * 0.621371192,3)return CAST(@retval as varchar(12)) + ' Miles'Endreturn '0 m'End
You can also use client end javascript to do this. Just get the logic from here. For formula reference you can follow this link.
Secondly you can use GDirection functionality to get the actual walking distance between the two points :
var fromAddress = 'San Francisco';var toAddress = 'Mountain View';var gdir = new GDirections(map, document.getElementById("directions"));GEvent.addListener(gdir, "load", onGDirectionsLoad);GEvent.addListener(gdir, "error", handleErrors);gdir.load("from: " + fromAddress + " to: " + toAddress,{ "locale": "en-US" });function handleErrors(){if (gdir.getStatus().code == G_GEO_UNKNOWN_ADDRESS)alert("Geo Address Not Found.\nError code: " + gdir.getStatus().code);else if (gdir.getStatus().code == G_GEO_SERVER_ERROR)alert("Server Error occurred.\n Error code: " + gdir.getStatus().code);else if (gdir.getStatus().code == G_GEO_MISSING_QUERY)alert("Missing Query.\n Error code: " + gdir.getStatus().code);else if (gdir.getStatus().code == G_UNAVAILABLE_ADDRESS)alert("Address Unavailable.\n Error code: " + gdir.getStatus().code);else if (gdir.getStatus().code == G_GEO_BAD_KEY)alert("Api Key not supported. \n Error code: " + gdir.getStatus().code);else if (gdir.getStatus().code == G_GEO_BAD_REQUEST)alert("Bad Request.\n Error code: " + gdir.getStatus().code);else alert("An unknown error occurred.");}function onGDirectionsLoad(){document.getElementById("getStatus").innerHTML = gdir.getStatus().code;}
You use either one of them based on your requirement.
4. How can I change Marker Icon in the map?
Ans : Are you bored of the same Red Marker Icon? If so, you can change the Icon of the marker using
GIcon.var new_icon = new GIcon();new_icon.image = "http://yourserver.com/images/cross.png";new_icon.size = new GSize(16,16);new_icon.iconAnchor = new GPoint(8,9);new_icon.infoWindowAnchor = new GPoint(7,7);marker = new GMarker(point,{Icon:new_icon,draggable:false});map.addOverlay( new_marker );
The Icon will be changed. You can also use
marker.setImage(') function to change the image of the marker icon.
But note that
setImage will not update the Shadow property of GIcon.5. How can I overlay an image in a map?
Ans : Obviously there is an option to generate maps with your custom overlay image. Let us see the example :
function initialize() {if (GBrowserIsCompatible()) {var map = new GMap2(document.getElementById("map_canvas"));map.setCenter(new GLatLng(40.740, -74.18), 12);// ground overlayvar boundaries = new GLatLngBounds(new GLatLng(40.716216,-74.213393),new GLatLng(40.765641,-74.139235));var oldmap = new GGroundOverlay("http://imageserv.com/myimage.jpg", boundaries);map.setUIToDefault();map.addOverlay(oldmap);}}
This will overlay the image on the boundaries provided.
6. Can I use US Zip Code to draw custom Polygons?
Ans : I have shown you how to draw custom polygon shapes based on data using AJAX. You can easily find database which provides informations on US zip codes and draw shapes on the map. I have uploaded an SQL server Database backup. You can find that here.
Download the file. Unzip it and Restore to SQL Server. You will find the data in a table called
USZIPINFO. The Schema of the table is : <code>[countrycode], [postalcode],[placename],[state], [county],[community],[latitude], [longitude][accuracy]
You can use this database to get the US Zip information country wise.
7. What are the limitation of the use of Google Map in commercial Sites?
Ans : As far as I know, Google Maps is a free service and you can use it freely to your commercial web sites, provided the map should be available freely from anywhere. By this word I mean the map should instantly appear from your site by just pasting the proper link to the address bar. The Map should not be hidden behind a loginto your website authentication. If you are doing something other than that, you can use Google Custom Enterprize map
Points to Remember
The points that you should always remember:
- If you have found a message like "API key is not correctly registered for that site," you should change the key element of the javascript tag to a valid key. You could get the key from this page.
- Never use google maps for showing illegal content. This may be violation to rights.
- For enterprise solutions, there may be a situation where you have to secure the map behind login. In that case, you should pay google for enterprise gmap contol.
History
It is really a fun creating map examples for you all. I tried to put most of the basics in this article but there are lot more to go. You can just copy and place code to a notepad, generate your api key, replace it in your javascript,and get your application to run.
Second Version : In my this updated I have added another feature to show custom context menu. Just check the last example for that.
Third Version : 27 SEP 2009 : After getting tons of mails to my mailbox, I added one FAQ section to describe the question that are asked the most.
Latest Version : 02 DEC 2009 : Street View panorama example added.
References
For further reading, you might start from :
Thank you for reading about my application.
Comments
Post a Comment