Integrating PayPal in PHP: How to Automate Online Payments Within Just a Few Minutes

Are you planning to start an online business? You will surely love to accept payments from international customers. All you need is a one-stop solution for every payment mode whether you are accepting payments via emails, credit cards or any other medium. Luckily, it’s quite easy these days, because many payment processors are available in the market. You must have the knowledge about PayPal, Stripe, Transfer wise, etc. They are facilitating the payment processes for online shops, digital agencies, freelancers and developers.
Being an online store owner, you can integrate PayPal in PHP applications within minutes. You can accept payments via plugins, addons, extensions, or manually via the framework-based applications. Moreover, you can also find built-in libraries and composer packages to cut short your development time.
In this article, I will demonstrate how to integrate PayPal in PHP.
What is PayPal?
PayPal is an internationally acclaimed payment processing company that offers secured and easy to use online payment methods. You can easily register your credit/debit card(s) with a PayPal account and can make your online payments effortlessly. It can be used by a variety of businesses including freelancers, digital agencies ecommerce store owners and more.
Some of the best features that PayPal offers include:
- Accept Credit Cards
- Online invoicing
- Buyer and Seller accounts
- Shopping cart
- Mobile Payments
- International Money transfer
How PayPal Works?
As mentioned earlier, using PayPal is quite easy. You just have to follow three steps to make an online payment successfully.
1- Choose PayPal to checkout
2- Login to your account
3- Confirm your payment and pay.
It really looks like an easy process. However, if you are working with any software product and need to accept recurring or one-time payments, then you need to do a bit more for it. You will need certain API keys to securely integrate PayPal in PHP applications, which requires a bit of technical knowledge.
So, here are the steps that can help you to integrate PayPal in PHP applications.
PayPal Payment Gateway Integration in PHP Websites
Let’s learn how to integrate PayPal in PHP websites within just a few steps:
Step #1 Create a PayPal Account and Get Sandbox Credentials
Create a PayPal account and get your sandbox credentials from your developer account. You will get credentials for both business and personal accounts.
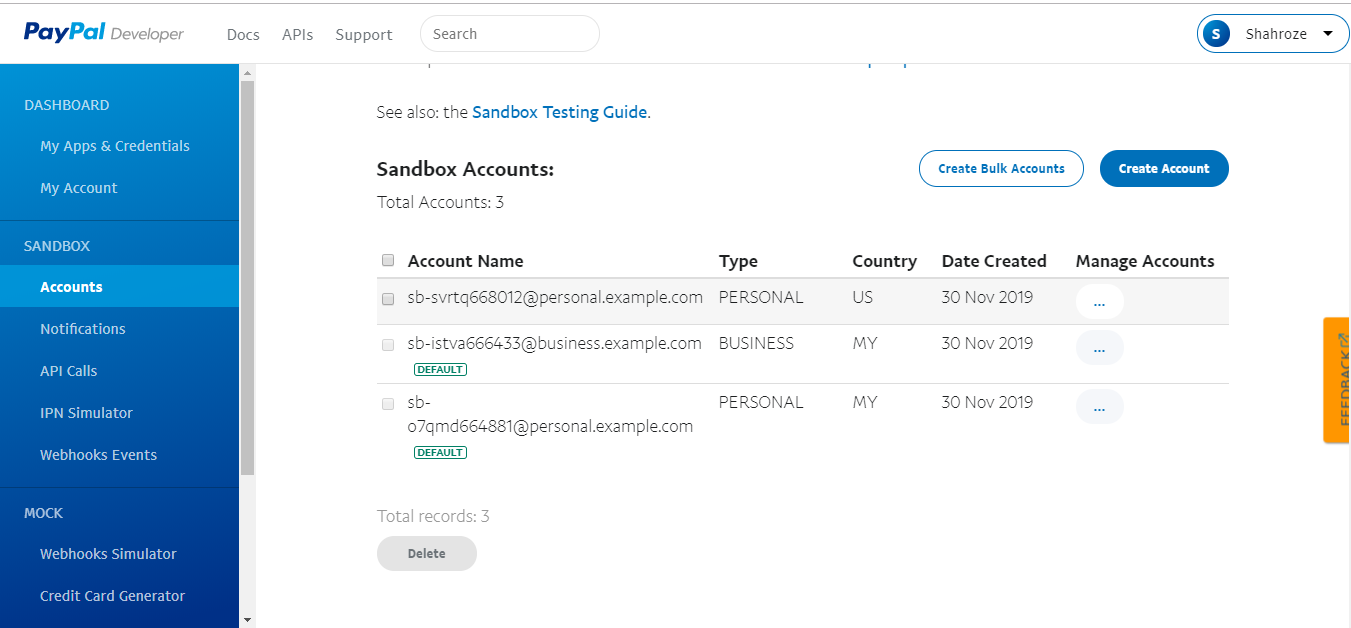
Then, you will need a testing email to accept or send payments. Because being in a testing environment, you cannot use live emails to accept online payments.
Step #2 Create PHP files to add Code
Now, create a directory folder to add PHP files. Check the structure in the image given below.
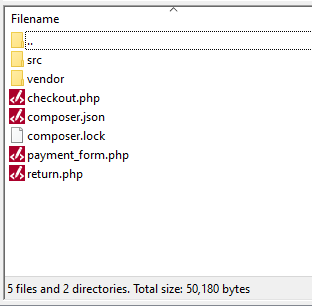
As you can see, there are different files in the above image. I’ll define the code that you need to put in each of the files. Since I’ve deployed the application on Cloudways, you must have an account to upload files. Signup and launch the PHP server then connect to FileZilla via SFTP and upload files.
Let’s come back to the code. After creating the directory, you must install Omnipay via composer. Login to the SSH account and navigate to your application. Run the following command.
- composer require omnipay/PayPal
This will install the package and we can configure PayPal easily. Omnipay allows you to configure the following PayPal options:
- PayPal_Express (PayPal Express Checkout)
- PayPal_ExpressInContext (PayPal Express In-Context Checkout)
- PayPal_Pro (PayPal Website Payments Pro)
- PayPal_Rest (PayPal Rest API)
I’ll be using PayPal Express with Omnipay. After the installation, you will see the composer.json file with the following code.
- {
- "name": "root/phpPayPal",
- "authors": [
- {
- "name": "Ahmed Khan",
- "email": "ahmedkhan_847@hotmail.com"
- }
- ],
- "require": {
- "league/omnipay": "^3.0",
- "omnipay/PayPal": "^3.0"
- }
- }
If you are working locally, you can also create this file and add the above-mentioned code manually then run `composer install` to add Omnipay in the project.
Step #3 Create Payment.php file
Create a folder called src and add a file, payment.php in it. Add the following code in the file and save it. The code contains comments that are self explanatory.
- <?php
- namespace Payment;
- use Omnipay\Omnipay;
- class Payment
- {
- /**
- * @return mixed
- */
- public function gateway()
- {
- $gateway = Omnipay::create('PayPal_Express');
- $gateway->setUsername("sb-7j4hl606677@personal.example.com");
- $gateway->setPassword("ARySNgUCvyU9tEBp-zsd0WbbNO_7Nxxxxoi3xxxxh2cTuDxRh7xxxxVu9W5ZkIBGYqjqfzHrjY3wta");
- $gateway->setSignature("EOEwezsNWMWQM63xxxxxknr8QLoAOoC6lD_-kFqjgKxxxxxwGWIvsJO6vP3syd10xspKbx7LgurYNt9");
- $gateway->setTestMode(true);
- return $gateway;
- }
- /**
- * @param array $parameters
- * @return mixed
- */
- public function purchase(array $parameters)
- {
- $response = $this->gateway()
- ->purchase($parameters)
- ->send();
- return $response;
- }
- /**
- * @param array $parameters
- */
- public function complete(array $parameters)
- {
- $response = $this->gateway()
- ->completePurchase($parameters)
- ->send();
- return $response;
- }
- /**
- * @param $amount
- */
- public function formatAmount($amount)
- {
- return number_format($amount, 2, '.', '');
- }
- /**
- * @param $order
- */
- public function getCancelUrl($order = "")
- {
- return $this->route('http://phpstack-275615-1077014.cloudwaysapps.com/cancel.php', $order);
- }
- /**
- * @param $order
- */
- public function getReturnUrl($order = "")
- {
- return $this->route('http://phpstack-275615-1077014.cloudwaysapps.com/return.php', $order);
- }
- public function route($name, $params)
- {
- return $name; // ya change hua hai
- }
- }
Now, you have to add Omnipay namespace to use the library functions. You can add it on top using Omnipay\Omnipay.
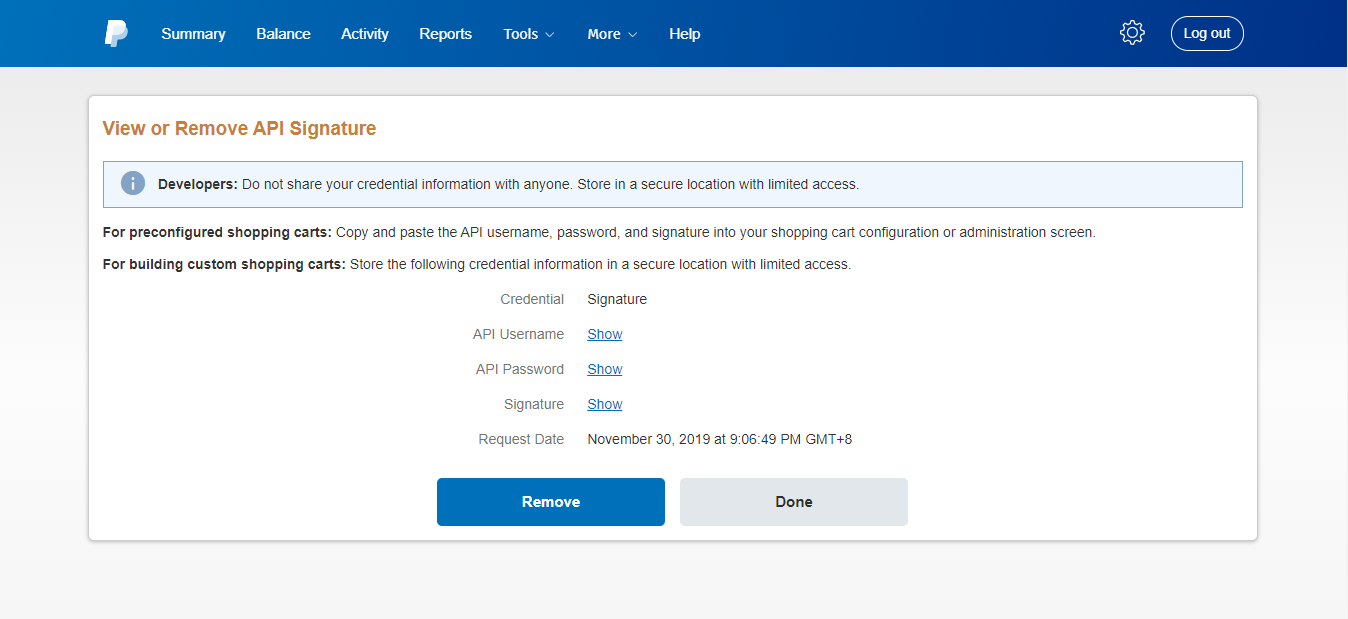
Now, declare the PayPal payment mode you will use to accept payments. For this tutorial, I’m using PayPal Express. Sometimes you need to add API credentials like username, password, and signature. You can find these credentials in Tools -> All Tools -> Integrate PayPal tab -> API Credentials. Check the screenshot given below.
You can now start using prebuilt PayPal methods for purchase, amount format, return URL, etc. Don’t forget to set this line to true for testing the gateway.
- $gateway->setTestMode(true);
Step #4 Create payment_form.php file
The next step is to create a form to submit payments to PayPal. This form includes the following fields.
- <?php
- include "vendor/autoload.php";
- include "src/Payment/payment.php";
- use Payment\Payment;
- $payment = new Payment;
- // ?>
- <!DOCTYPE html>
- <html lang="en">
- <head>
- <meta charset="UTF-8">
- <meta name="viewport" content="width=device-width, initial-scale=1.0">
- <meta http-equiv="X-UA-Compatible" content="ie=edge">
- <title>Pay with PayPal</title>
- <!-- Latest compiled and minified CSS -->
- <link rel="stylesheet" href="https://maxcdn.bootstrapcdn.com/bootstrap/3.3.7/css/bootstrap.min.css" integrity="sha384-BVYiiSIFeK1dGmJRAkycuHAHRg32OmUcww7on3RYdg4Va+PmSTsz/K68vbdEjh4u" crossorigin="anonymous">
- <!-- Optional theme -->
- <link rel="stylesheet" href="https://maxcdn.bootstrapcdn.com/bootstrap/3.3.7/css/bootstrap-theme.min.css" integrity="sha384-rHyoN1iRsVXV4nD0JutlnGaslCJuC7uwjduW9SVrLvRYooPp2bWYgmgJQIXwl/Sp" crossorigin="anonymous">
- <!-- Latest compiled and minified JavaScript -->
- <script src="https://maxcdn.bootstrapcdn.com/bootstrap/3.3.7/js/bootstrap.min.js" integrity="sha384-Tc5IQib027qvyjSMfHjOMaLkfuWVxZxUPnCJA7l2mCWNIpG9mGCD8wGNIcPD7Txa" crossorigin="anonymous"></script>
- </head>
- <body>
- <div class="container">
- <div class="row">
- <div class="col-md-6">
- <form class="form-horizontal" method="POST" action="https://www.sandbox.PayPal.com/cgi-bin/webscr ">
- <fieldset>
- <!-- Form Name -->
- <legend>Pay with PayPal</legend>
- <!-- Text input-->
- <div class="form-group">
- <label class="col-md-4 control-label" for="amount">Payment Amount</label>
- <div class="col-md-4">
- <input id="amount" name="amount" type="text" placeholder="amount to pay" class="form-control input-md" required="">
- <span class="help-block">help</span>
- </div>
- </div>
- <input type='hidden' name='business' value='sb-7j4hl606677@personal.example.com'>
- <input type='hidden' name='item_name' value='Camera'>
- <input type='hidden' name='item_number' value='CAM#N1'>
- <!--<input type='hidden' name='amount' value='10'>-->
- <input type='hidden' name='no_shipping' value='1'>
- <input type='hidden' name='currency_code' value='USD'>
- <input type='hidden' name='notify_url' value='<?php echo $payment->route("notify", "") ?>'>
- <input type='hidden' name='cancel_return' value='<?php echo $payment->route("http://phpstack-275615-1077014.cloudwaysapps.com/cancel.php", "") ?>'>
- <input type='hidden' name='return' value='<?php echo $payment->route("return", "http://phpstack-275615-1077014.cloudwaysapps.com/return.php") ?>'>
- <input type="hidden" name="cmd" value="_xclick">
- <!-- Button -->
- <div class="form-group">
- <label class="col-md-4 control-label" for="submit"></label>
- <div class="col-md-4">
- <button id="submit" name="pay_now" class="btn btn-danger">Pay With PayPal</button>
- </div>
- </div>
- </fieldset>
- </form>
- </div>
- </div>
- </div>
- </body>
- </html>
The above form will show the basic input field which asks the desired amount to process. When you will submit the amount, you will be redirected to the PayPal sandbox site to login. You can log in with the test credentials which I’ve shown above in the first image of this tutorial.
Testing PayPal for Payment Submission.
At this stage, all the files should be uploaded to the Cloudways PHP web hosting server. Find the application URL in Application Access Details page. The URL will be like:
http://phpstack-275615-1077014.cloudwaysapps.com/payment_form.php
You will see the basic form as the one shown below:
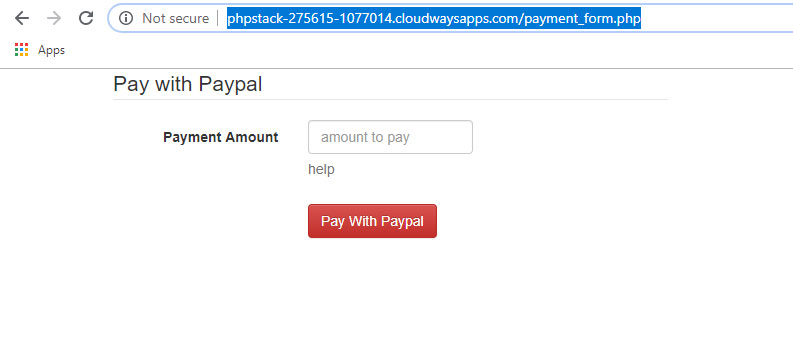
Enter the amount and log in to your testing account with test credentials, for instance:
Email: sb-svrtq668012@personal.example.com
Password: #qYxx$x4
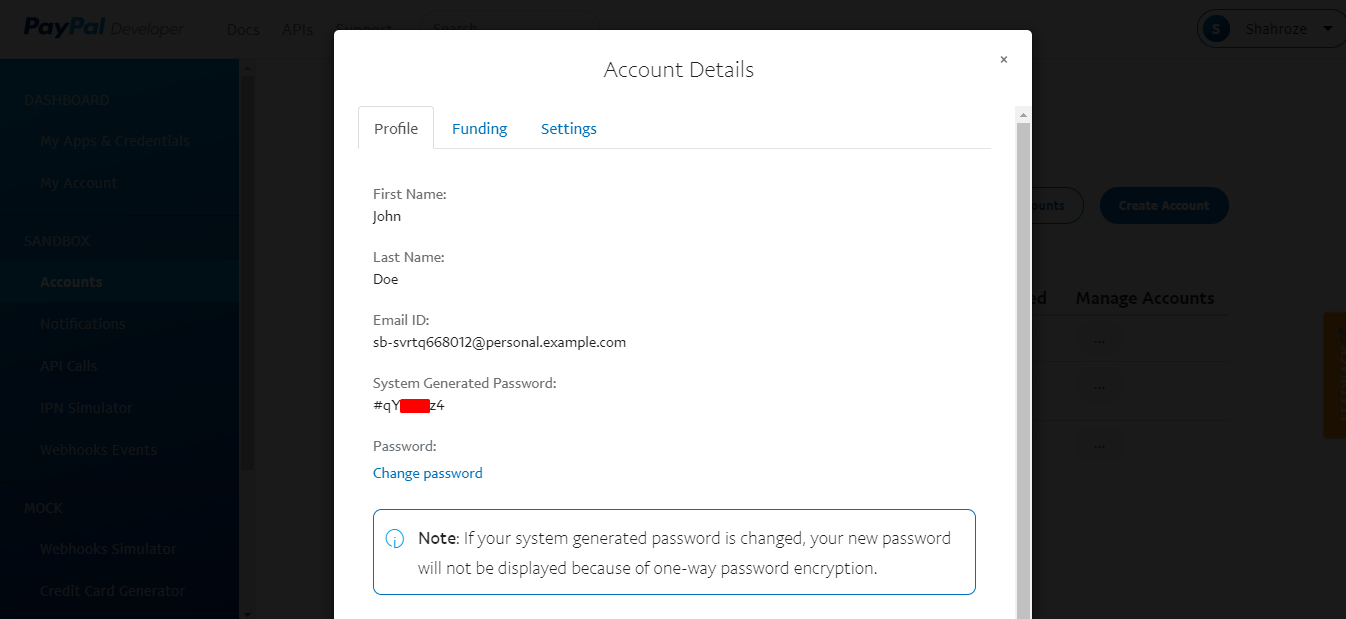
This will take some time to process. Once the process is completed, you will see the Pay Now window. Click it and the amount will be paid from your testing account.
Check the demo below:
I’ve also set the redirect URL. If you want to cancel the payment, just click the cancel link at the bottom, and you will be redirected to the cancel page. Similarly, you can create different pages like success, notify, etc. using the same practice.
Final Words
In this tutorial, I have demonstrated how one can integrate PayPal in PHP applications. You can extend it to more complex usage like online shops etc. You can also save product payments in the database with status. PayPal carries out a strong checkup on accounts for any fraud activities so I would suggest you not to use it for any bogus payments otherwise, your account will be banned.
If you still have some more questions regarding this article, please feel free to write them down below in the comments section.
Comments
Post a Comment